Announcing Quina (My First App)!
About six months after I wrote this post, I published a longer, more technically in-depth version of this article on CSS Tricks.
…And about a year and a half later, I released Quina v2. Lots of the things in both this post and the CSS Tricks article are outdated now (especially the screenshots) but the underlying technical information is still accurate.
One of my favorite code hobbies is making games on CodePen. I’ve got a handful I’ve created in the online sandbox code editor over the years—Connect Four, Color Flood, Hangman and sliding puzzles, to name a few—but I’ve wanted to build a legit, standalone app for a long time now.
As a secondary goal, I wanted to get that app listed in a major app store. There are plenty of hurdles for web devs in this regard; the app stores out there are mostly full of native apps (apps built with native iOS or Andriod code, rather than web languages).
However, at some point, I found out that the Google Play Store allows certain web apps to be listed, which was the breakthrough I was looking for. This past August, I decided it was finally time to start seriously working toward my app goal.
Finally, after four months, dozens of nights and weekends, hundreds of git commits, and more debugging-related curse words than I’d care to try counting, I’m thrilled to introduce my first app ever: Quina!
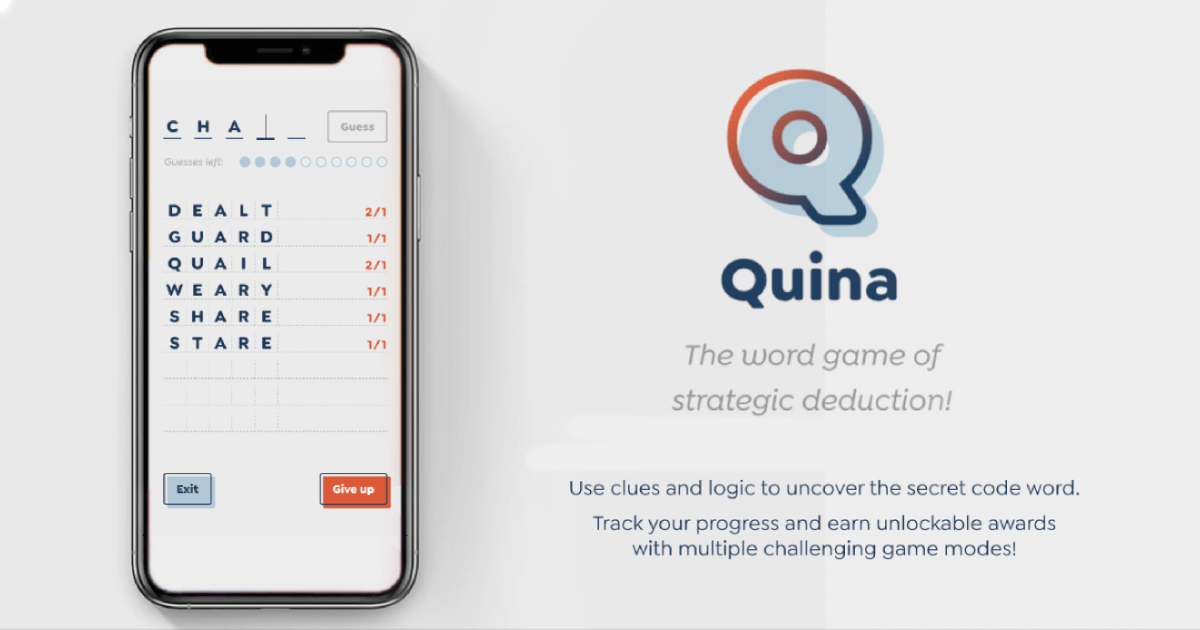
Quina is a classic word game where users attempt to guess a secret five-letter word.
What is Quina?
Quina is a classic word game. I didn’t invent it by any stretch, but I had a version in mind that I’ve never seen anywhere out there on the web before. (The original iteration is a pen-and-paper game called Bulls and Cows, though it’s known by other names, too.)
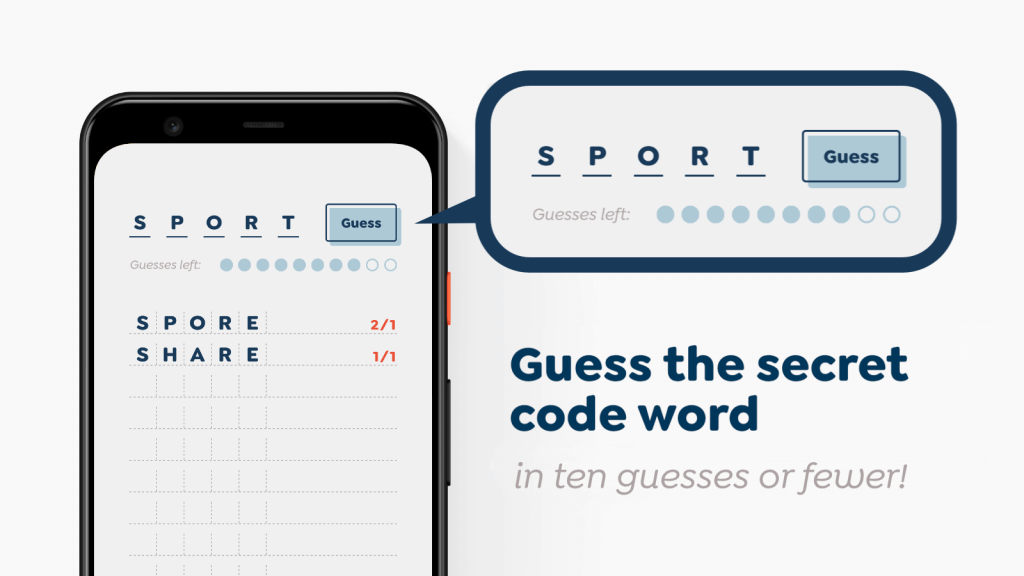
The idea is pretty straightforward: you have ten chances to guess a secret five-letter code word. After each guess, you get a clue that reveals some info about how close your guess is to that code word. I suppose you’d primarily consider it a word game, but there’s a good amount of strategy and logic involved as well.
If this sounds familiar, it’s probably because you’ve either played the original, or played its most popular variant; Mastermind is another version of the same game.
By the way, “Quina” was chosen for the name since it’s Latin for “five at a time” (according to a Google search, at least; I sure don’t speak the language). The original version of the game is played with four letters instead of five, so the name seemed fitting.
I don’t know how that word was meant to be pronounced, but I say it, “QUINN-uh.” (I’m probably wrong, but hey, it’s my game. I can call it whatever I want. Just ask the guy who invented gifs.)
How to install Quina
There are two ways to install Quina:
- You can download the Quina Android App from the Google Play Store.
(It’s $2.99, but all content is unlocked by default.)The app is now free.
When visiting the website, you should see a prompt like this one (though it will depend on your browser; if you don’t see the prompt, you can follow these directions):

You should see the “Add Quina to home screen” prompt when visiting quina.app.
You could also just play the game on the website, in your browser, if you want to. It’s designed to work best as a mobile app, however.
Game features
Beyond the core word game, Quina has a number of features to hopefully keep it entertaining and engaging for a good, long while.
The images below are from the Google Play Store app listing, so they’re a bit more marketing-y than I’d normally choose. Sorry.
- Quina offers three different word sets to help players find the right challenge level: Basic, Tricky, and Random. All told, there are about 1,200 code words between the three.
- Basic sticks to common, everyday English words; Tricky has some curveballs and harder words; and Random just lets you enjoy the challenge of not knowing.
- Players also have the option to start the game with a hint, if they want (either a small one or a big one), to make the game a bit more accessible.
- There’s a quick-start tutorial, as well as a more in-depth explanation of the rules.
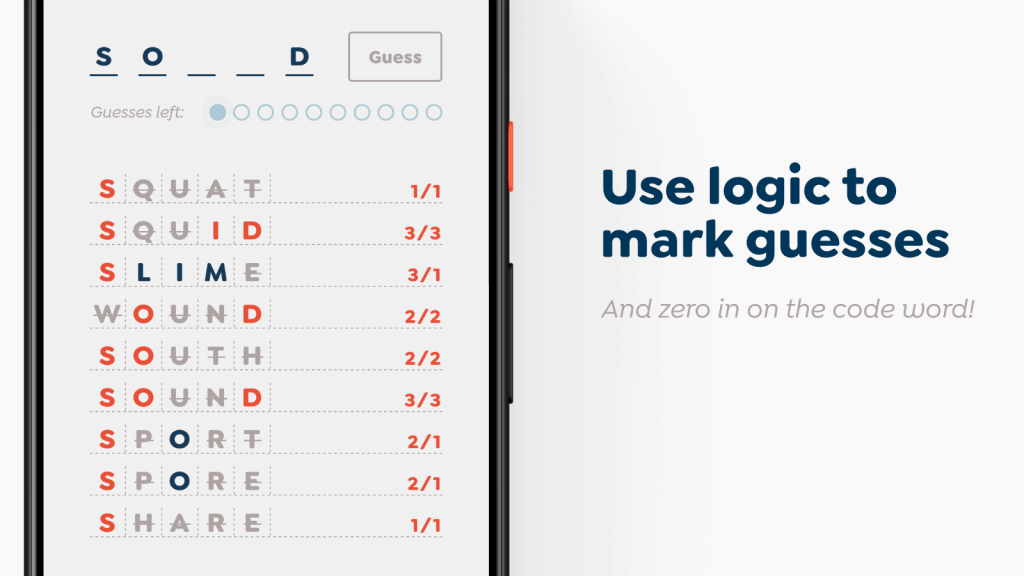
- As you play, you can mark up your guesses to help you deduce the meaning behind the clues.
- Quina tracks your game history and shows your statistics (data is saved in your device’s local storage; no need to sign in or create an account, and no security risks)!
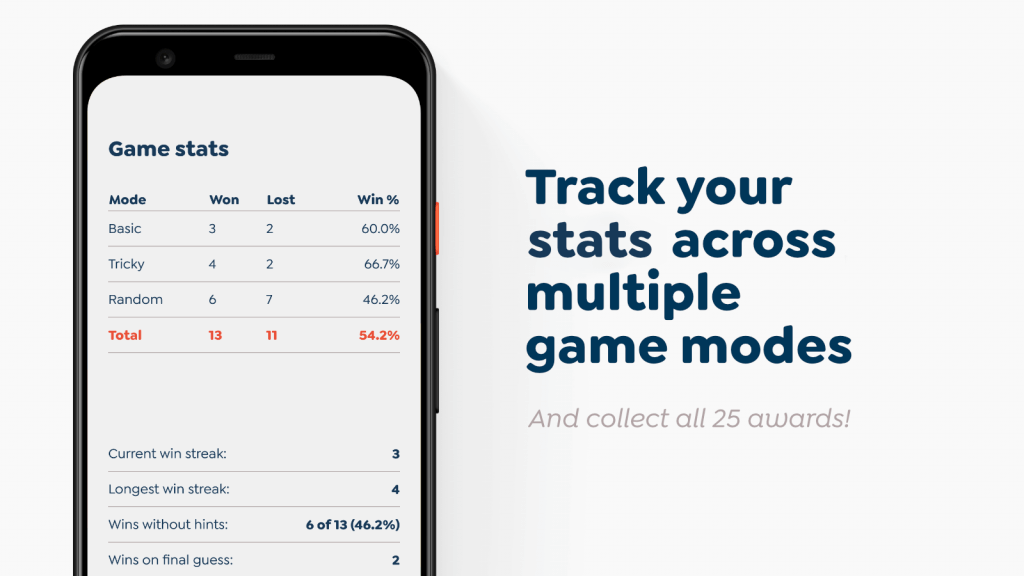
- The game also offers 25 awards you can unlock for specific achievements, like winning five games in a row, or playing a certain number of games without hints.
- There’s a built-in dark mode and the option to reduce motion, both of which detect and default to your OS preference.
- Finally, just to give it that native feel, the game also uses (sparing) sound effects and device vibration.
![]()
The tech behind the app
For those into such nerdery: Quina is a Progressive Web App (PWA) built with Nuxt. If you’re not familiar with those terms:
Progressive Web Apps are essentially websites, but with some extra features that make them behave like native apps.
There’s a lot more detail in the link above, but the main features of a PWA include: the ability to actually install the website/web app on your device and launch it fullscreen, just like an ordinary native app; to run offline (thanks to JavaScript service workers); and access to device functionality like push notifications and vibration, via modern browser enhancements.
If you’ve ever visited a website and been prompted to add it to your home screen, that website was probably a progressive web app.
You can build a PWA with anything you might use to build a website; plain ol’ HTML, CSS and JavaScript will work just fine, and you definitely don’t need to use a framework (let alone one as robust as Nuxt). As I considered the options, however, it became clear that Nuxt was my #1 choice, and one I’ve never regretted.
Nuxt is a framework for building apps with Vue (Vue being a JavaScript component framework). As the name implies, Nuxt is the Vue equivalent of React’s Next.js, if that helps.
In any case: Nuxt helps you create web apps by giving you all the things you might want while building with Vue, such as routing and global state management (you create pages just by plopping files in a /pages directory; how novel!), and wraps them all up in one easy-to-use package.
Why Nuxt?
The main reason I personally chose Nuxt was familiarity; Vue is my most-used JavaScript framework. It’s conveniently also one of my favorites, and I’d used Nuxt before (albeit in a much more limited context). I also wanted a good excuse to learn more about Vue Router and Vuex (both bundled in Nuxt) than the bits I’d picked up from my day job. (Mission accomplished there.)
That said, however: I considered using Svelte (really the only other contender in the “favorites” category), but decided its ecosystem was still a little too young and too small for a project this ambitious and with this many unknowns. I was confident that whatever issues I might have run into with Nuxt, its ecosystem was large enough that I could find a solution. With Svelte, I was concerned that I might have to hand-roll more things than I wanted to (especially with the recent upheaval in its own pre-1.0 app framework, Sapper). I would still reach for Svelte on a project with smaller scope or fewer unknowns, though, and eagerly look forward to what will come out of it in the next year. I’m sure I’ll use it again.
Back to Nuxt, though: appealingly, Nuxt also has a rich library of optional first-party modules available to make integrations and advanced functionality easier.
For example: actually getting all the features of a PWA up and running on your own would be challenging to say the least, but Nuxt has an installable PWA module that handles most of the heavy lifting for you with a few lines of config! There are also plugins for analytics, connecting to third-party services and APIs, and all kinds of other things.
The game actually runs as a static site, however (albeit with a healthy dose of JavaScript); Nuxt can either build out your finished product to run on a Node server, or as a statically generated site. I chose the latter, since there isn’t really anything I need done server-side (thanks mainly to the fact that all of Quina’s data is saved in local storage, rather than in a database).
I did have a version of Quina working with Firebase authentication and Firestore for permanent accounts and data storage, but I abandoned that when security became too difficult and I realized it was overkill for what I was trying to do.
![]()
The app is deployed on Netlify, by the way, in case you were curious. (That part was never a question; Netlify is amazing.)
Other than the previously mentioned Nuxt PWA module, the only additional tech/package things I used were:
- A web audio library called HowlerJS (mostly to handle sound latency on iOS, which, it turns out, is a real problem, especially when working with synchronous sound);
- An NPM package called Canvas Confetti (to generate the fireworks on the win screen);
- The vue-observe-visibility library for some nice scroll effects; and
- Some free third-party sound effects, mentioned more specifically in the app’s FAQ page.
Other than what’s listed here, everything in the app is original and coded from scratch (including the brand and all the CSS).
Building an Android App from a PWA
At the outset, I knew it was possible to list a PWA in the Google Play Store. (Not Apple’s, though; Apple is much more restrictive—some might say antagonistic—when it comes to the web these days.) I didn’t know how much work it would be to get Quina listed in the Play Store, but I quickly found out.
Before going too far, though: I should mention that turning a web app into a proper Android app is possible because of a thing called Trusted Web Activity (or TWA).
TWA is a technical term, but what it means is: you have the ability to create an Android app that doesn’t have any real code or content of its own; it’s just a shell, built to load one specific web app using your device’s browser, and display it like a native app.
That’s what Quina and any other TWA app is; effectively, a browser that auto-loads a specific web URL, disguised as an app.
It’s called Trusted Web Activity because in order to make it work right, you need to bundle your app with a secret key that matches a key that lives on your website. (More on that in a bit.)
It’s also required that the URL you’re linking to qualifies as a progressive web app; web.dev offers tests to certify that. Mostly it’s making sure you have the proper PWA manifest, a service worker (to make the app available offline, like a native app), and that your site loads over HTTPS. I won’t go into any of those here, since there are better resources already out there on the ins and outs of PWAs.
Generating an app from web content
There are at least a dozen ways you can go about generating a native app from web content. There are apps and frameworks like NativeScript, Cordova, React Native, Ionic, and others that all promise the ability to build a native iOS and/or Android app in the web languages you already know (HTML, CSS, and JavaScript).
I found each of those to have a steep learning curve, however, and I wasn’t ready to invest the time into learning one just for this project. It seemed to me that each one came with a promise of “build for the web!” with the strong hidden fine print of “but not really; you gotta learn this thing first.” So while they’re certainly much better than sitting down to learn Android development, they didn’t really live up to the promise as much as I would’ve hoped.
There are also blog posts online that walk you through the steps to generate an Android app using Android Studio, that you can theoretically follow along with even without knowing what you’re doing, and I tried some of those. But (as with most things Google-related), either the tech had already changed too much in the time since the post was written to follow along smoothly, or it just wasn’t well-explained.
Each dead end was deflating, but each one also helped me get a glimpse of the bigger picture and move closer to the end goal.
It was when I finally stumbled upon a marvelous little CLI tool called Bubblewrap that I knew I could finally stop looking.
Bubblewrap at a glance
The topic of using Bubblewrap to generate an Android app could easily take up its own 5,000-word blog post, but in short:
I don’t want to short-change Bubblewrap, because it’s undeniably amazing, and odds are good that my app wouldn’t be in the store without it. But again, as with anything related to Google tech: it’s not quite that simple.
The first hurdle is getting all the dependencies installed in the proper location. Bubblewrap is really explicit about where it wants to find its dependencies, and each one is pretty chonky. The documentation I followed was already outdated, but fortunately, I was able to Google for some updated answers (as I recall, I needed to download an older version of one of the dependencies).
After that, the main issue is getting your app’s key synced up with Google Play.
Again, I won’t go too far into detail here (maybe I’ll write a separate post one day), but as mentioned before: TWA apps check your URL for the app’s encrypted key, and if found, the app knows it can trust the website and load it as the app’s contents.
This was the most challenging part, honestly. Google Play offers a feature where they generate a key, and you just copy and upload it to your site. That probably would’ve been the easier way to go, but Bubblewrap requires you to provide a key when it generates your app, and that’s not as simple as just pointing it to a file; there’s passwords, encryption, and specific naming conventions involved. Plus, since everything is happening on the command line, you need to be really careful about special characters in passwords.
So regardless of what you do here, you’ll need to jump through some hoops. (I wound up using keytool to generate a key and used that, because I’d already taken that approach in a failed tutorial.)
If the key hosted on your site doesn’t match the key in your Play Store app, the app will still work, but it will just function like an ordinary browser window, rather than looking like a native app.
The other really tricky part was that both Google and Bubblewrap ask you for an app name in a format like app.builder.build. It was frustratingly impossible to figure out what was expected to provide in that format—some I saw started with app, others with com; some had three parts, others two. It seemed like there must be some proper protocol to follow here, and I didn’t know what it was.
Turns out, there’s no real rule that I can find here, other than: make it unique. The format is apparently a Java convention. (Android apps are often built with Java, it would seem.) Typically, it appears most apps are named such as tld.developerName.appName, but again, the only real important thing is uniqueness.
By default, Bubblewrap validates that your live web app meets all PWA criteria. Quina was failing the offline test for some reason even though I knew it was valid, but helpfully, there is a flag to skip the check.
The Google Play Store (is awful to use)
This section is mainly just going to be me griping, but if you’re gonna go down this route, you should be warned about this stuff. Some of my least favorite hurdles:
- You have to pay Google $25 and apply for a developer account just to start (probably reasonable, but still feels kinda steep).
- Starting January 2021, Google will not allow any payment providers other than Google Pay, which charges a 30% (thirty percent!) fee—ten times what similar payment providers like Stripe charge. (And yes, this applies to app purchases, too—which means Google gets almost $1 of every $2.99 download).
- EDIT: apparently this change may be legally contested by some US states.
- You cannot delete an app you’ve created in the Google Play developer console, ever. Even if you just typed a few things into a text box and never did anything with it, you still can’t delete that.
- This means if you mess something up and need to start over, you can never use that same app ID again. You just gotta pick another one, create a new app, and upload a new package.
- If you make your app free, you can never make it paid again, even if it hasn’t actually launched yet. So you’ll have to just start over with a whole new app, which means filling out allllll the fields all over again. (And again: it’ll need a new unique app ID.)
- If you let Google handle signing your encrypted key, you can never opt out of that choice. You just have to create a new app and generate a new bundle.
- You can’t even launch a test app without providing several different images for the store page and filling out all the required text fields.
- Reviews are said to take 1–2 days in most cases; I found it was actually much longer than that (though updates once the app was initially approved typically take about a day).
- Once, Google blocked my release for violating a policy that hadn’t even gone into effect yet, and wouldn’t for another two months. I never heard back on that dispute, either, so I just worked around it. (Edit: they got back to me eight days later, but by then the workaround was already in place.)
- Things are buried in hard-to-find locations.
tl;dr: Google sucks. But hey, at least they let you list PWAs in their store, which is more than I can say for Apple.
The upside of all of this, however, is that with a TWA app, unless you’re changing a fundamental detail of the package itself (like the app ID or PWA URL), you never need to upload a new package to the app store; you can just update your actual PWA running on the web, and the Android app will pick up the changes when it launches.
As a side note, however: I did find some unexpected drawbacks to the “build once, run everywhere” approach—namely, that your interactive elements have to be able to handle clicks, right-clicks, touches, long-presses, swipes, and all types of key presses (pun intended) without those events doubling up or conflicting with each other. Something to keep in mind with this approach to development.
Monetization
While making money on Quina was never a primary goal, I put a lot of time and effort into the game, and I did hope that by getting it into a major app store, it might generate some revenue (though my expectations were never high; just hoping for some beer money here, maybe).
If I went down that road, I would be locked into Google Pay (and its extortive fees) for support donations, which I wasn’t even sure I could implement in a web app in the first place. Certainly not as easily as, say, Stripe.
What I eventually settled on was:
- Making the web version free, but with some content unlocked with a supporting donation;
- Making the Android app paid, but with all content unlocked by default.
You might be wondering how I achieved that, since it’s all the same web app under the hood in both situations. Turns out, all Android apps send a unique header with their requests, so it was easy enough to tell which traffic was coming from my Android app, and set up conditional checks for content based on that header. (I even created custom <WebOnly> and <AndroidOnly> Vue components for content relevant only to one of the two.)
Incidentally, there’s also a free option on the web version, just because I wanted the content to be accessible for anyone and everyone.
Final thoughts
I would consider Quina my biggest achievement as a developer so far. Though I’ve made websites, small web apps, little PWAs and novel browser games as side projects before, none has ever had this breadth of scope, and an actual Android app is brand-new territory for me!
I’m proud of the work I’ve done here, even if nobody plays it. But I hope you’ll give it a shot, and that you enjoy it if you do. (And if so, I’d love it if you’d leave a review on the Google Play Store.)
Thanks for reading! Feel free to reach out if you have any questions or comments.