Let's learn SvelteKit by building a static Markdown blog from scratch
[Edit December 2025]: This guide has aged. Nowadays, when when you’re running the script to set up a new project, you get the option to add mdsvex from the get-go, so you don’t have to go through a lot of these steps.
This guide also predates Svelte 5, so some of the code may be a bit outdated (albeit still workable). I’m leaving it here because some parts of it may still be useful, but know it’s not exactly modern anymore.
If you’ve ever recommended a favorite book, movie, or TV show to a friend who didn’t enjoy it at all, you know exactly how I felt when I saw this message from a colleague:
man I just tried to hello world SvelteKit and it is NOT for me
I love Svelte, and I’ve talked plenty about how much I’ve enjoyed rewriting this site using SvelteKit. So my first reaction, of course, was disappointment. What went wrong?
But as I considered their reaction, I realized: it was valid.
Amazing though it is, SvelteKit isn’t the simplest thing you could use as a static site generator.
Other tools like Astro, Eleventy, or Gatsby will likely get you up and running faster, since that’s their sole focus. (At one point, at least, even the SvelteKit docs admitted its focus was not making the fastest static site generator.)
However, I still feel SvelteKit is worthy of serious consideration in that regard. Its capabilities are much more broad and flexible than traditional SSGs, and there’s plenty unique to love about both its developer and user experiences. So this post will be aimed at smoothing out that initial learning curve, to help you understand and take advantage of SvelteKit’s wide range of possibilities.
What we’ll cover, and what to know first
This is a walkthrough of using SvelteKit to set up a prerendered static blog with Markdown, Sass and an API. (That’s how this site is built, by the way.)
This is also an intro to SvelteKit itself, with a good overview of SvelteKit fundamentals that should be transferable to any project.
Finally, this is fun!*
*My opinion; citation needed
You’ll get the most out of this if you:
- Know the fundamentals of front-end development and JavaScript;
- Have at least a basic understanding of Svelte already. (You can probably follow along regardless, but I’d recommend the Svelte tutorial first if you’re brand-new);
- Know the basics of both Markdown and Sass;
- Understand the basics of fetching JSON from an API; and
- Know how to install packages with npm, and have npm installed already.
Finally, if you don’t really want to go through the whole tutorial and would rather just have a nice blog starter all ready to go, check out my SvelteKit blog starter here. (It’s much more fleshed-out than what we’ll build here, but the underlying concepts are the same.)
Let’s get started!
Creating a new SvelteKit app
To generate a new SvelteKit project, run this in your terminal (naturally, you can change my-app to whatever other title you prefer):
npm create svelte@latest my-appWhen you run that init command, SvelteKit will ask you some questions about your project and how you want it set up:
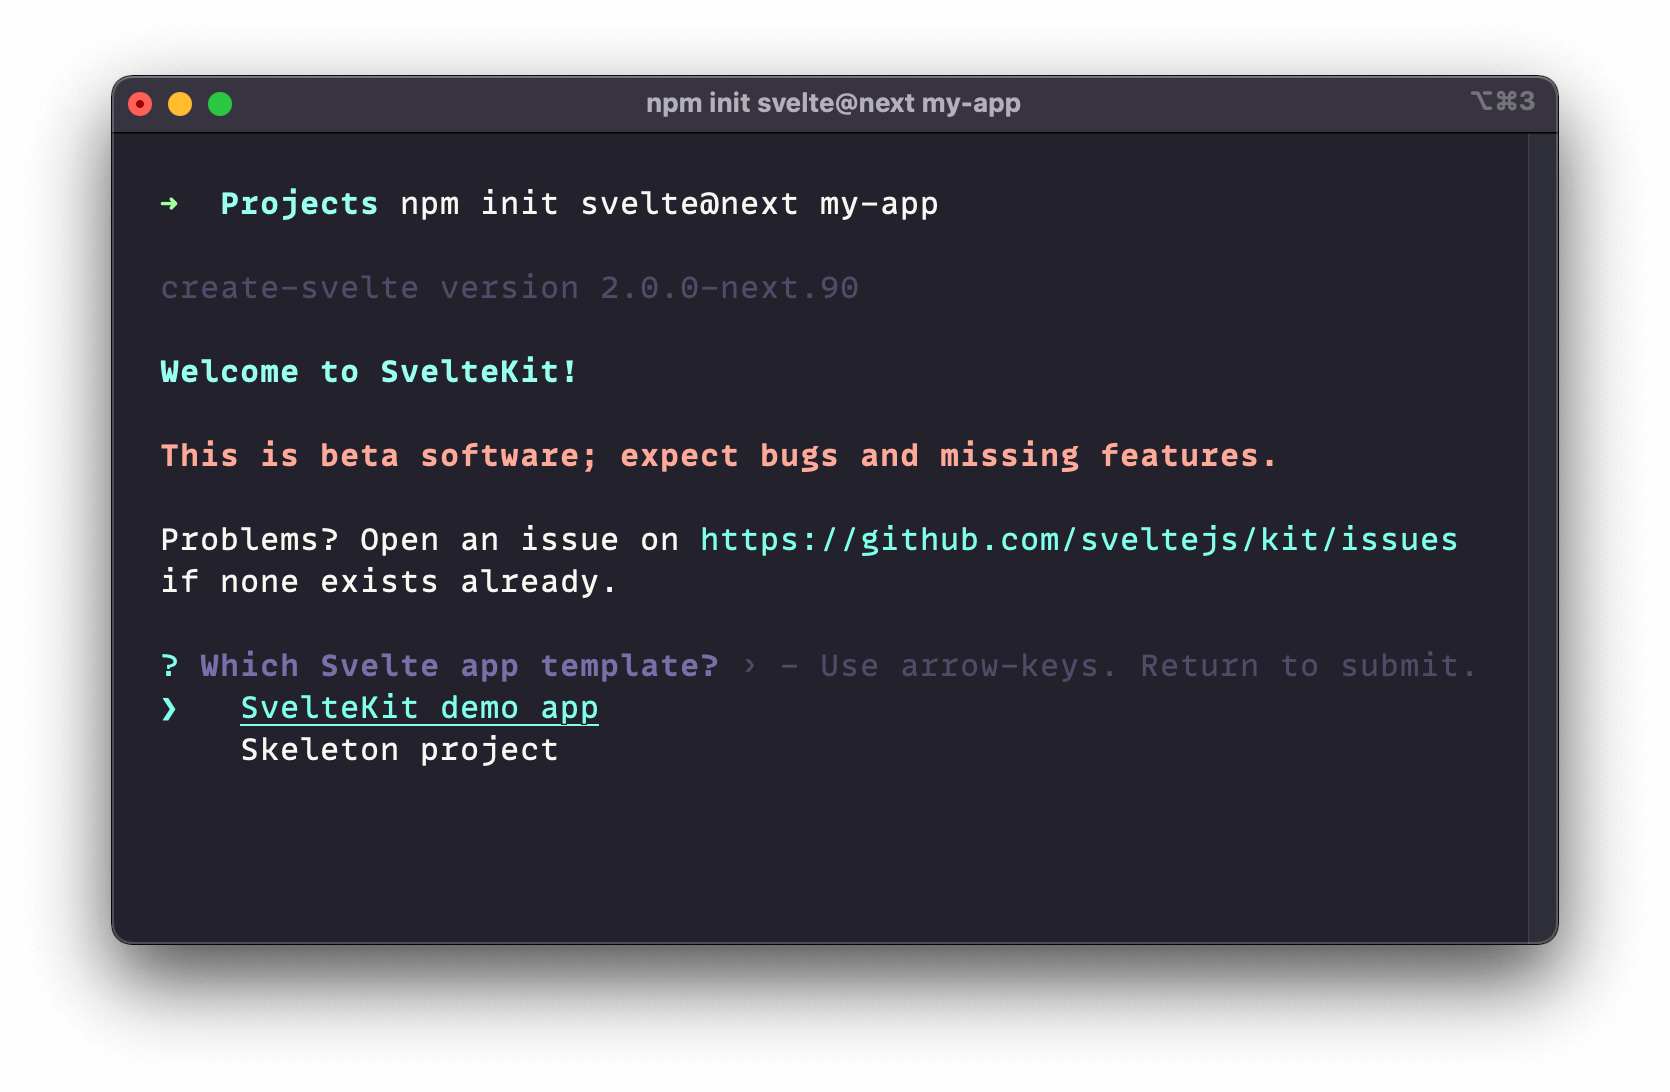
We’ll select the “Skeleton project” option. (Note: not “Library skeleton project;” we’re just building a site, not a library.)
If this is your very first time using SvelteKit, feel free to choose “SvelteKit demo app,” poke around a bit to get a sense of how things work, then come back. It’s a good intro, but it comes with several files and styles that would be a lot to undo as a starter.
The setup tool will also ask for your preferences on TypeScript, ESlint, and Prettier. For simplicity’s sake, I won’t use TypeScript, but you’re welcome to if you like. (Svelte works quite well with it.)
Once you’ve made your choices, after a moment of installation, you should see Your project is ready! appear in your terminal, along with next steps and helpful links:
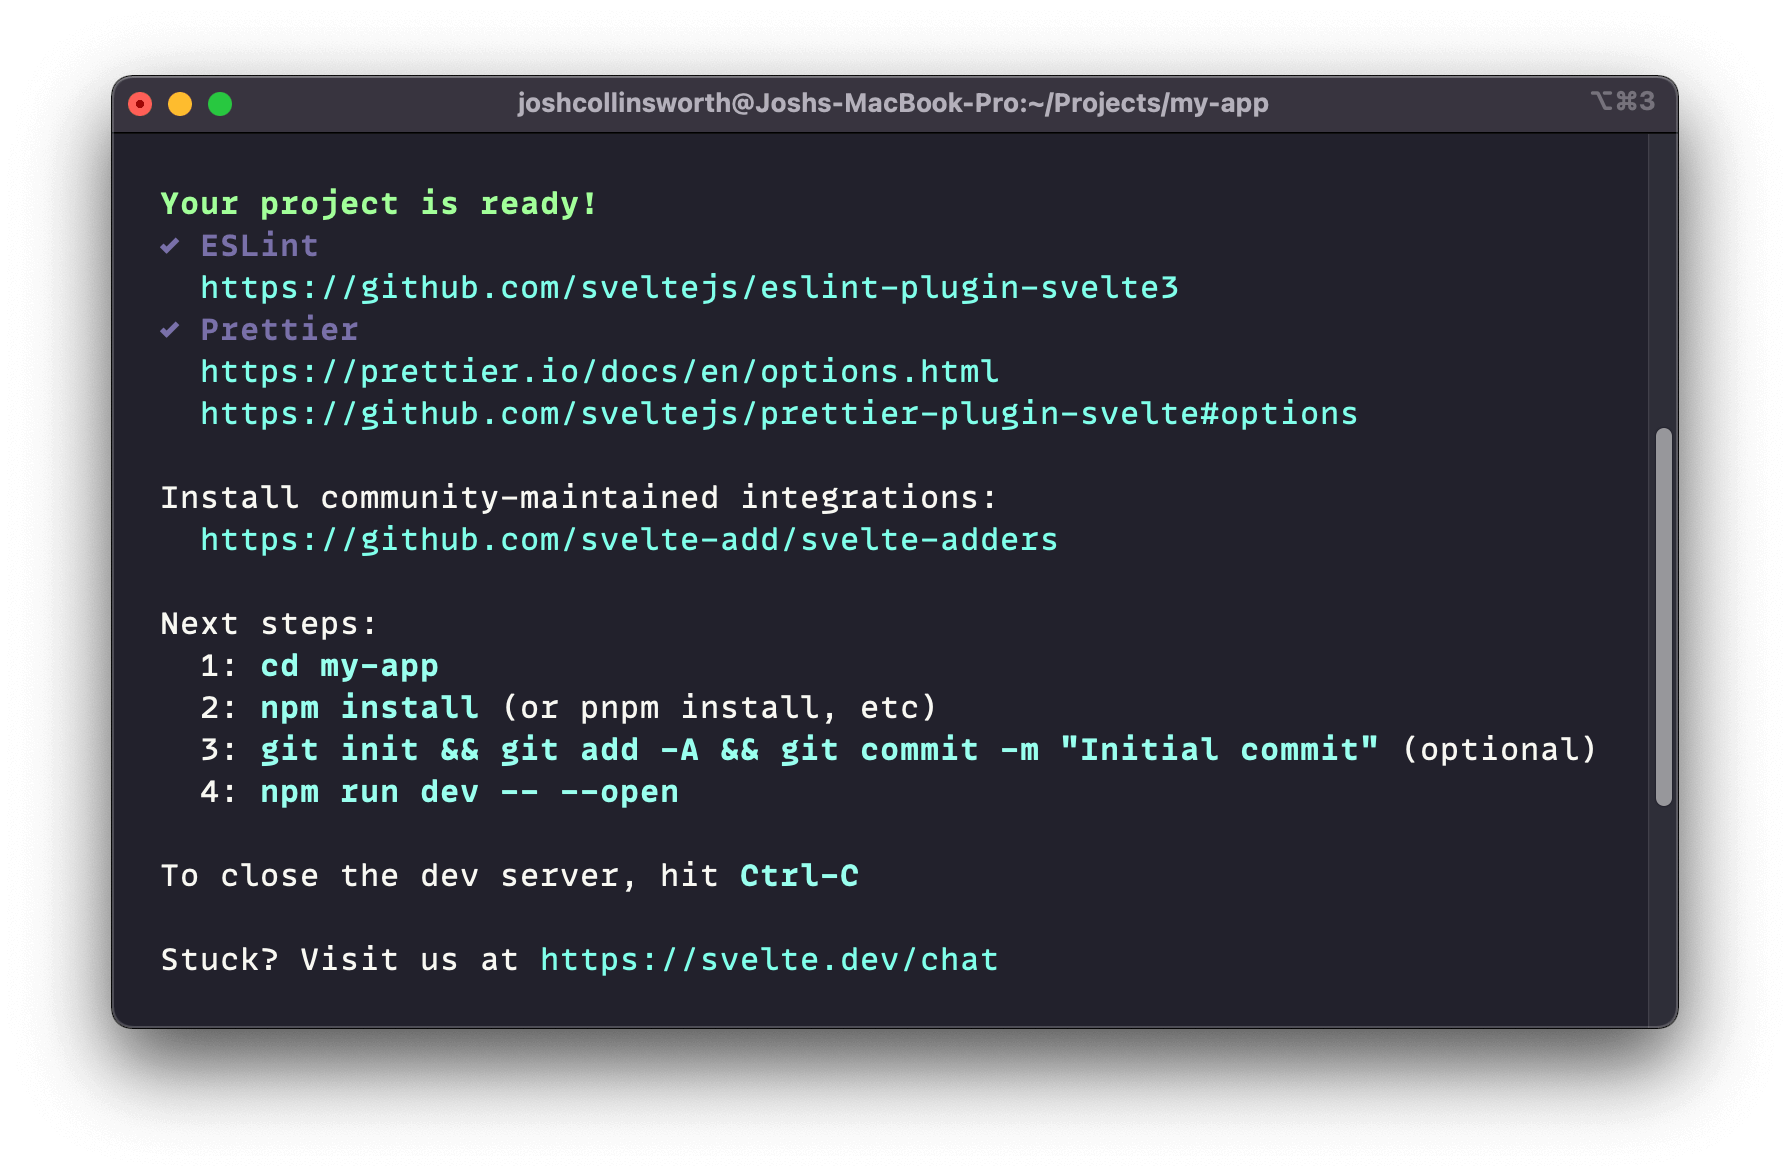
At this point, let’s open up the project in VS Code (or your text editor of choice). Then in the terminal, install the dependencies, and then run the dev server:
npm install
npm run dev -- --open
Complete those commands, and our new site will be running in a browser window!
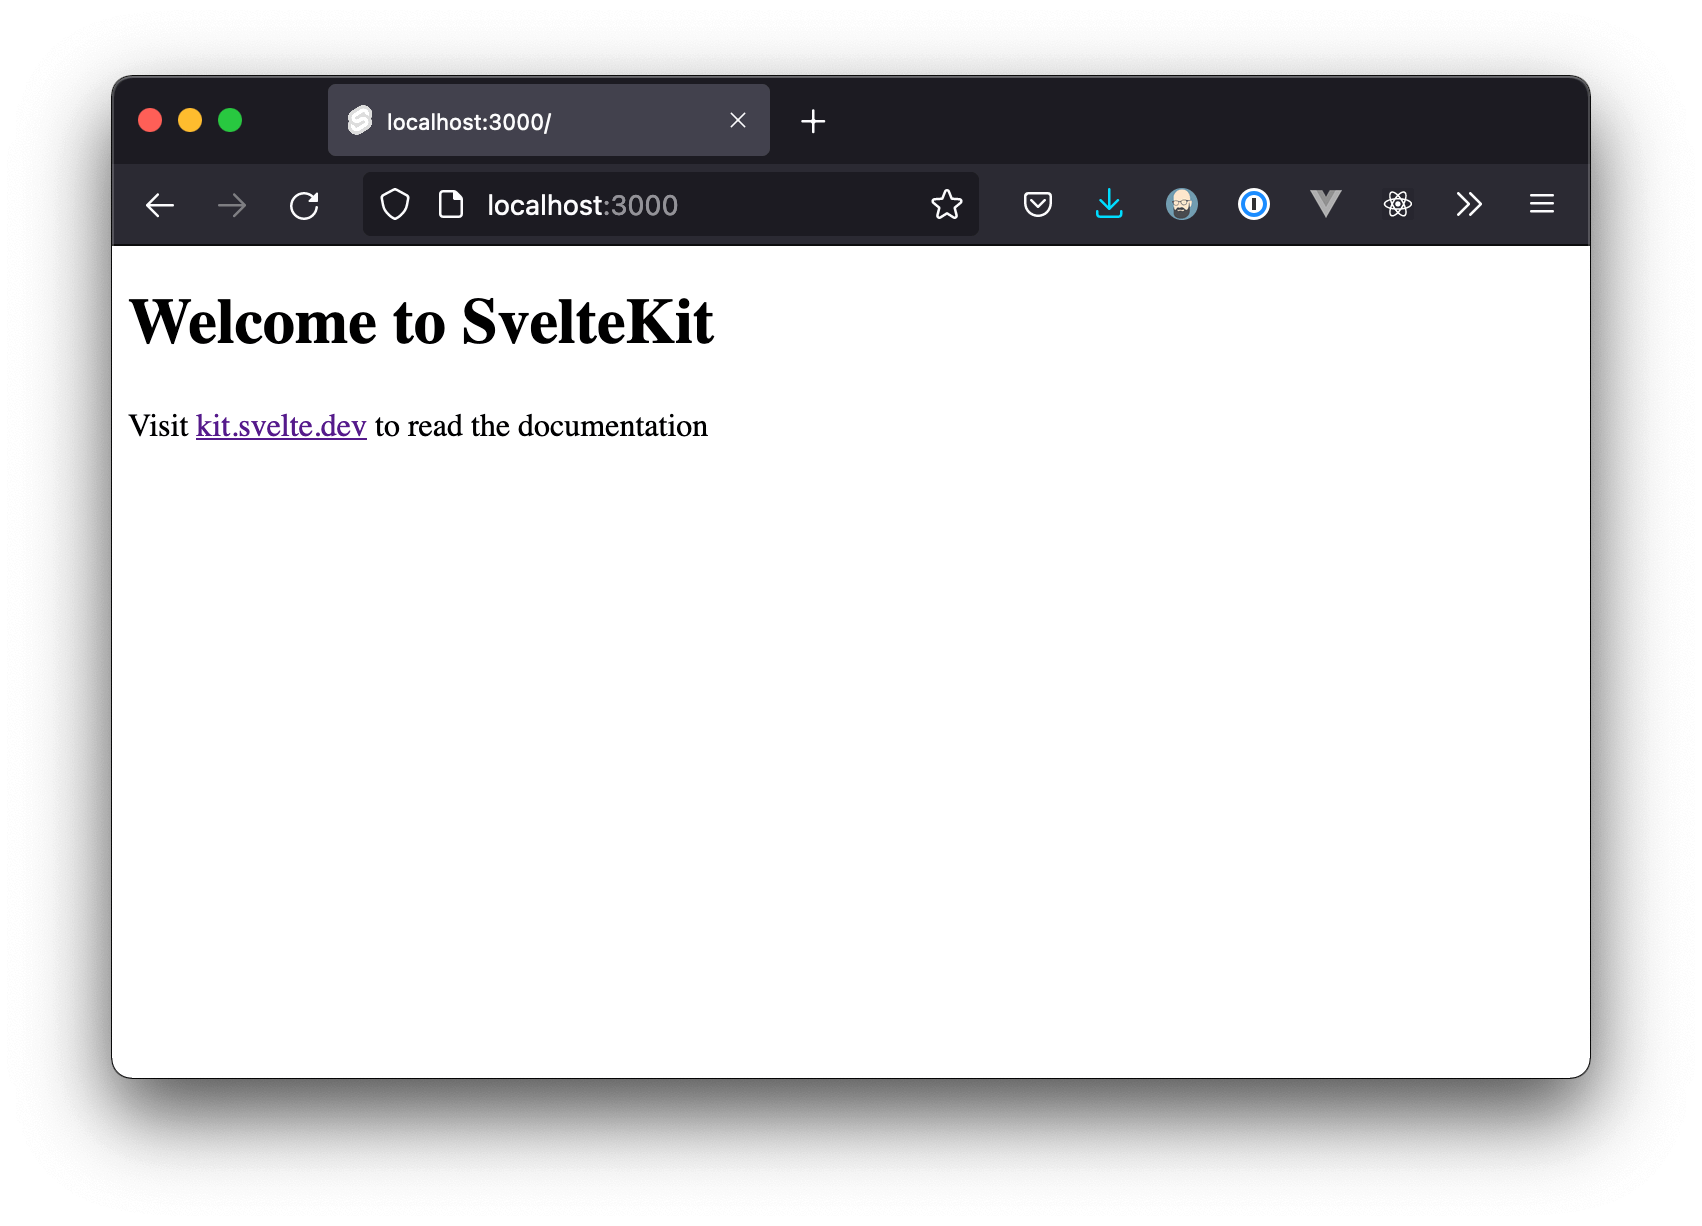
The skeleton project is definitely unexciting. There isn’t even any CSS yet. But that’s ok; it gives us the freedom to style our app however we like, without the need to remove or work around any existing code.
This is our blank canvas, and we’ll get some paint on it soon enough.
Routing in SvelteKit
Like many frameworks (and for that matter, PHP), SvelteKit has a directory-based approach to routing and pages; the structure of src/routes/ will mirror the structure of your website.
src/routes becomes the name of a page. A +page.svelte file inside that folder defines the page's HTML content.So, from inside src/routes:
+page.svelteis the homepage (/)about/+page.sveltewould become the/aboutpageblog/+page.sveltewould be be the/blogpageblog/some-post/+page.sveltebecomes/blog/some-post
The convention of +page.svelte might seem a bit confusing or unnecessary—especially if you're used to the old index.svelte convention—but as we'll see soon, the special + prefix helps distinguish between components and pages.
There are also other things we can add to routes besides just pages, like dynamic server paths; more on that later.
Adding pages
For starters, just to get some pages on our site, let’s create about, contact, and blog folders inside of src/routes. (We can always delete or modify them later.)
Within each of those folders, we’ll add a +page.svelte file, to serve as the route’s contents; the stuff people actually see when they navigate to that route on your site.
Within each of those files, let’s toss a quick heading, and maybe some text, just so we can see a little content.
Svelte files can just contain plain HTML.
<!-- about/+page.svelte -->
<h1>Hi, I'm Josh!</h1>

<p>This is my about page.</p>
<!-- contact/+page.svelte -->
<h1>Get in touch</h1>
<p><a href="mailto:me@my.tld">Email me!</a></p><!-- blog/+page.svelte -->
<h1>Blog</h1>
<p>My blog posts will go here eventually…</p>Our src/routes folder should now look like this:
📂 src
┗ 📂 routes
  ┣ 📜 +page.svelte
  ┣ 📂 blog
  ┃ ┗ 📜 +page.svelte
  ┣ 📂 about
  ┃ ┗ 📜 +page.svelte
  ┗ 📂 contact
    ┗ 📜 +page.svelte
At this point, you could visit /contact, /about, and/or /blog to see the pages we just created. There’s not much there yet, of course, but it’s nice to at least see that routing is taken care of for us automatically, just by creating folders inside routes and adding a +page.svelte file inside them.
Adding a layout
Most sites and apps have some elements that are reused on every page (a <header> and <footer> being the most common and obvious examples). Since adding those to every page would be tedious and error-prone, SvelteKit (like many other frameworks) conveniently lets us define layouts.
Inside of src/routes, make a new file named +layout.svelte.
📂 src
┗ 📂 routes
  ┗ 📜 +layout.svelte
This file has a special role: SvelteKit automatically checks routes (and all its subdirectories) for a +layout.svelte file. That layout will “wrap” all the content loaded from that route and its sub-routes.
So a layout at the top level of the routes folder will apply globally, on every page.
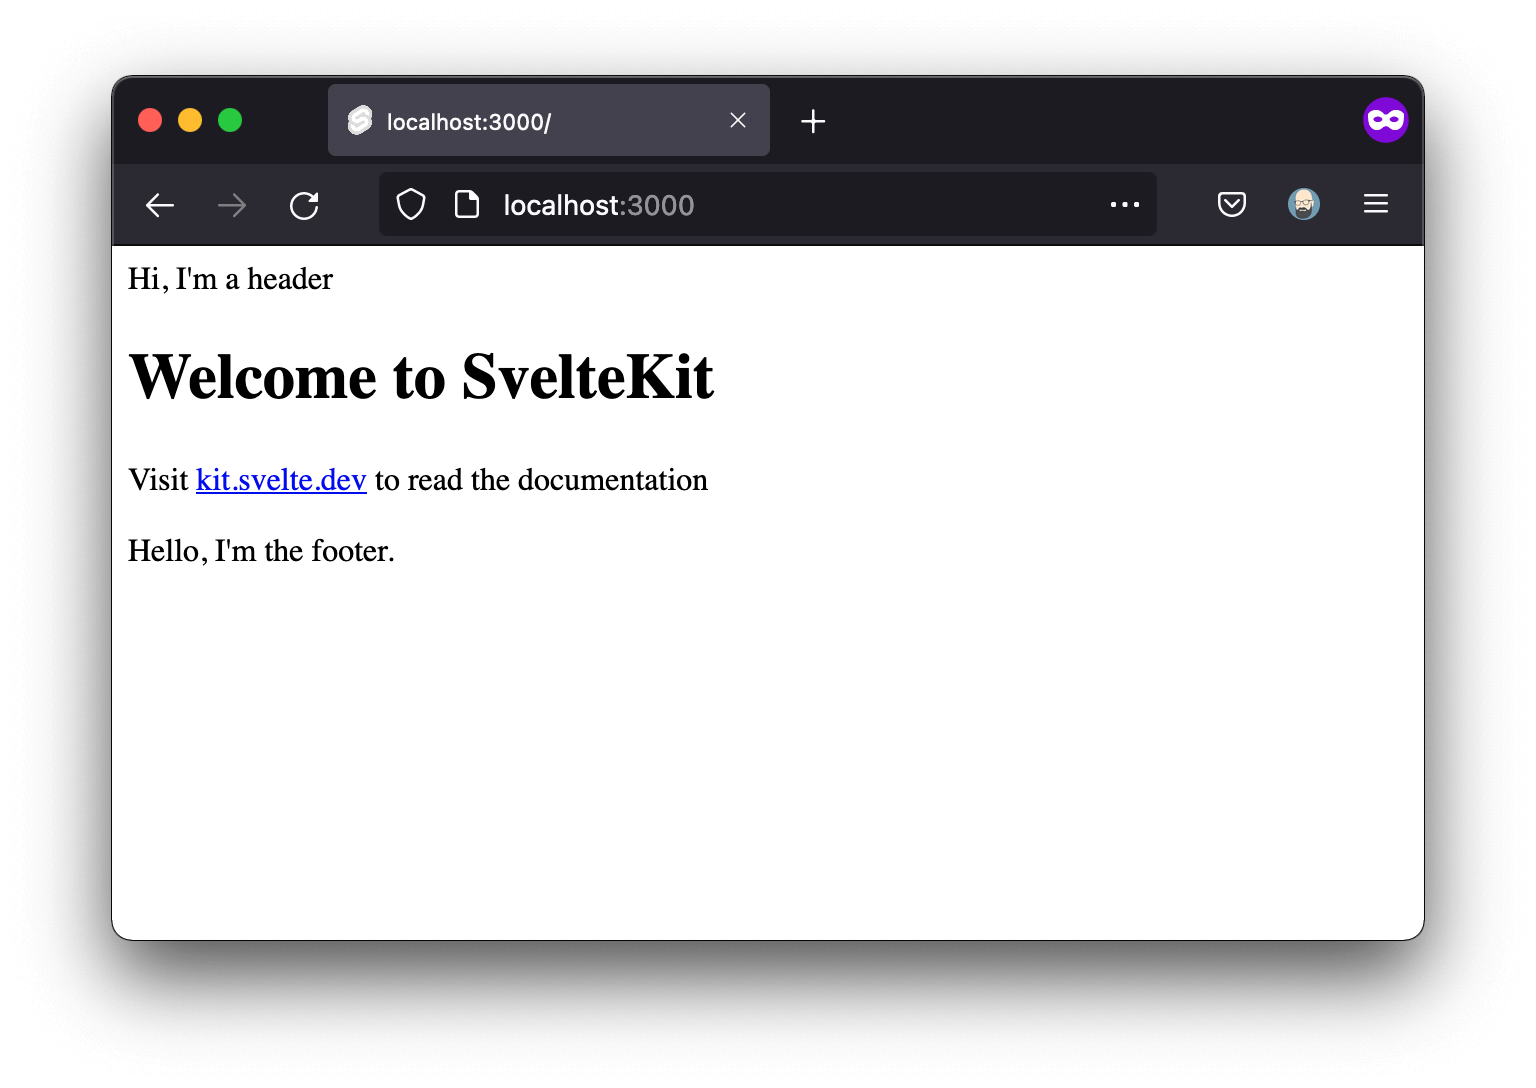
It’s easier to show than tell, so open up our new +layout.svelte file, and let’s add a placeholder header and footer:
<!-- +layout.svelte -->
<header>Hi, I'm a header</header>
<main>
<slot />
</main>
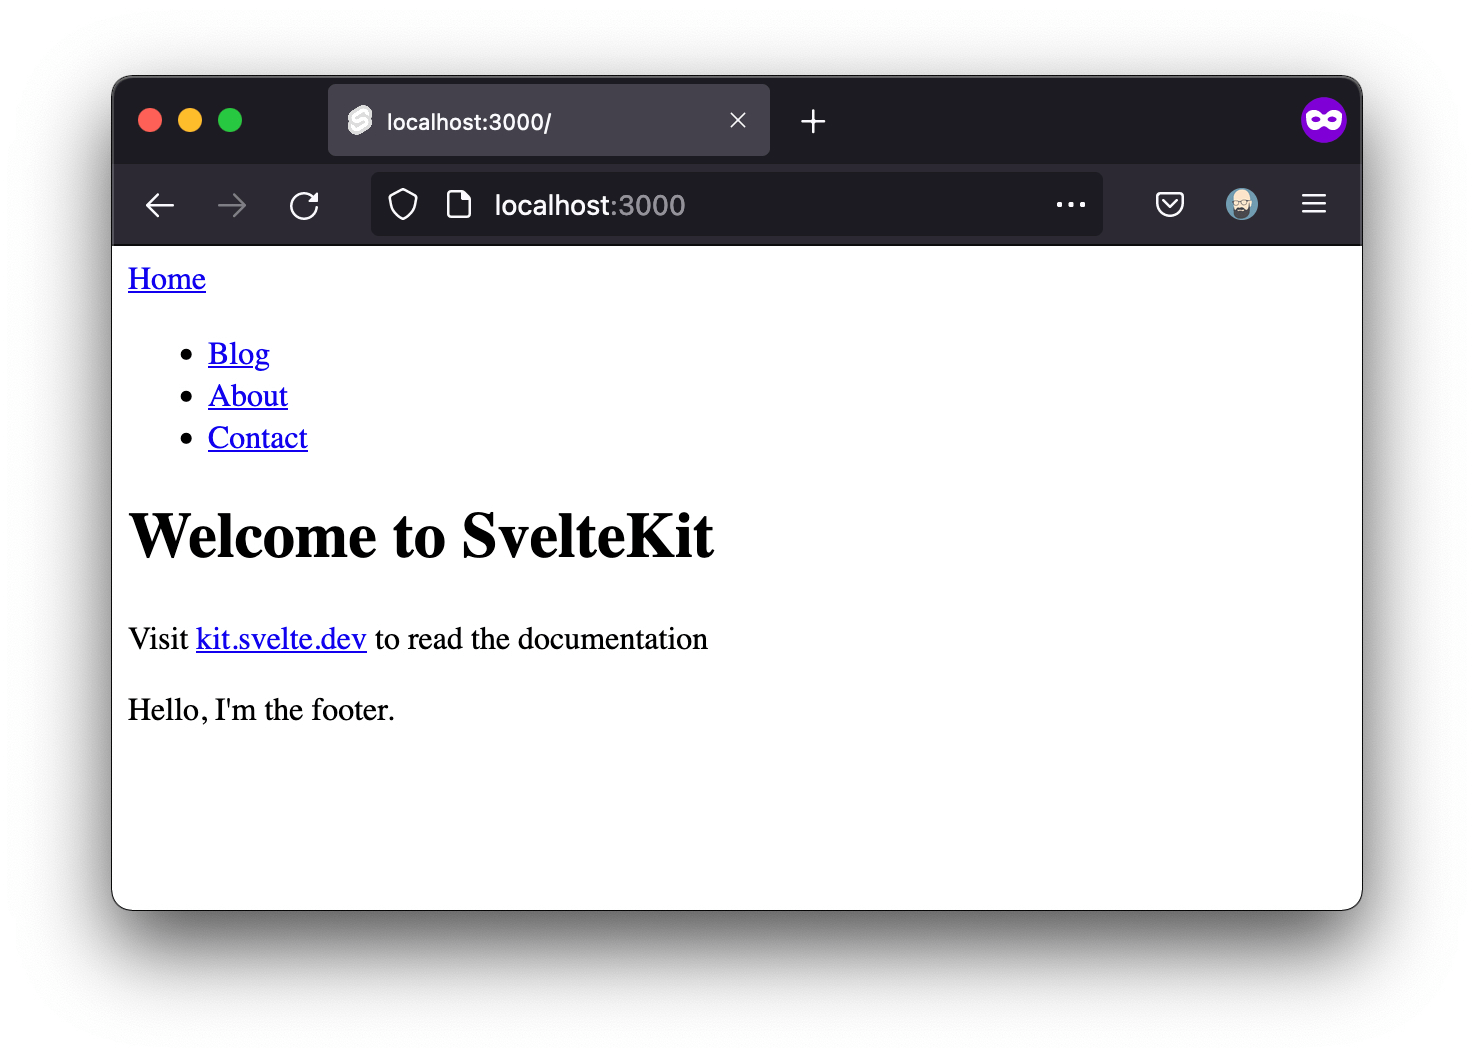
<footer>Hello, I'm the footer.</footer>Save that, and you should now see that header text above the page’s contents, and the footer text below.
Creating components
Manually typing routes in the browser isn’t great, so let’s add some navigation. In the process, we’ll create our first component.
First, create a new folder called lib inside of src. (lib is another SvelteKit convention; more on that in a moment.)
Inside src/lib, we’ll create a folder named components, just for organizational purposes. And inside of that, we’ll create a new component named Header.svelte:
📂 src
┣ 📁 routes
┗ 📂 lib
  ┗ 📂 components
    ┗ 📜 Header.svelte
You don’t have to capitalize component names, or keep components in their own folder, but both are generally preferred conventions.
Inside our new Header component, let’s place some proper (albeit basic) navigation:
<!-- Header.svelte -->
<header>
	<a href="/">Home</a>

	<nav>
		<ul>
			<li>
				<a href="/blog">Blog</a>
			</li>
			<li>
				<a href="/about">About</a>
			</li>
			<li>
				<a href="/contact">Contact</a>
			</li>
		</ul>
	</nav>
</header>
Save that, and let’s go back to +layout.svelte to use it!
To use a component, we first need to import it, which means we’ll need to add a <script> tag to our layout. (I personally prefer it at the top of the file, but Svelte gives you the freedom to arrange components however you like.) Once imported, we can replace our placeholder header with the component:
<!-- +layout.svelte -->
<script>
	import Header from '$lib/components/Header.svelte';
</script>

<Header />
<!-- The rest of the HTML here -->
Notice the import path. $lib is a handy alias that goes directly to src/lib, saving you from typing tedious relative paths. (You can customize this alias or add your own in jsconfig.json, but I won’t cover that here.)
Anyway, now we should see something slightly more user-friendly in our browser:
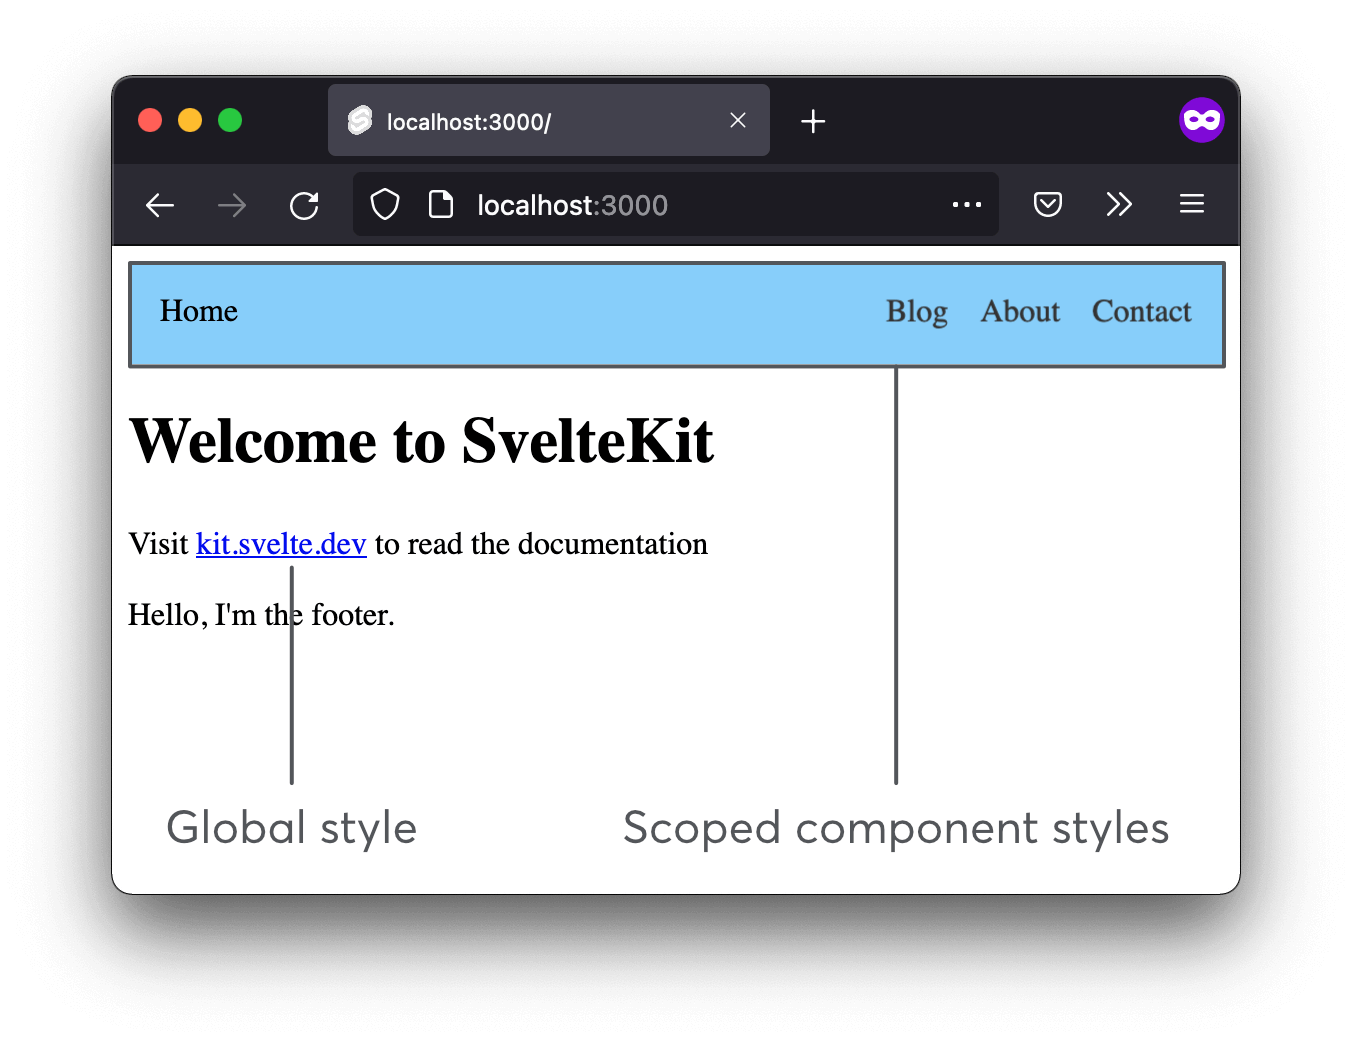
The styling still isn’t great, but it’s usable. We can click between pages now, which will make testing things out a lot easier.
Component styling
Svelte component styles are scoped by default. That makes it easy to write CSS without fear of it bleeding out and having side effects anywhere outside the component.
To try it out, in Header.svelte, add a <style> tag. (It could go anywhere, but I prefer to put it at the end.)
<!-- Header.svelte -->

<!-- ... The rest of the file's contents here -->
<style>
	header {
		padding: 1rem;
		background: lightskyblue;
		display: flex;
		flex-wrap: wrap;
		justify-content: space-between;
	}

	ul {
		margin: 0;
		list-style-type: none;
		display: flex;
		gap: 1rem;
	}

	a {
		text-decoration: none;
		color: inherit;
	}
</style>
If you save and take a look at the site now, you should see your Header component looking a little more header-like. You might also notice that the styling doesn’t affect anything in our main page content. That’s the power of scoping!
If you want to, you could repeat this process with a <Footer /> component now, too. I’ll skip over it, since it’s just the same thing over again, but it’s a good thing to do at some point.
Remember: components related to routing (like pages, layouts, and endpoints) begin with a +. Normal, reusable components don’t, and are usually capitalized. (You can keep both in the routes folder, but often, it’s preferred to have reusable components in lib instead.)
Stylesheets in SvelteKit
Svelte lets you import stylesheets directly into components—including pages and layouts. There are other ways to load stylesheets, but I find that’s the best. It’s easy, for one thing, but more importantly, it also preprocesses them automatically, which we’ll want when we add Sass shortly.
Create a new folder inside of src/lib for your styles, and add a style.css file inside it.
📂 src
┣ 📁 routes
┗ 📂 lib
  ┣ 📁 components
  ┗ 📂 styles
    ┗ 📜 style.css
There are no rules about how you structure things inside of src/lib. You aren’t even required to use lib at all. Feel free to organize your folders however you like.
You can add whatever CSS you prefer, but if you need a suggestion, here’s a little bit of boilerplate that should begin to get things looking slightly better:
/* style.css */
body {
	margin: 0;
	background: #eee;
	color: #333;
	font-family: sans-serif;
}

main {
	padding: 1rem;
	margin: 2rem auto;
	max-width: 40rem;
}
Once we’ve got a stylesheet with some CSS in it, loading it globally is as easy as importing the file in our layout:
<!-- +layout.svelte -->
<script>
	import Header from '$lib/components/Header.svelte';
	import '$lib/styles/style.css';
</script>

<!-- ...HTML here -->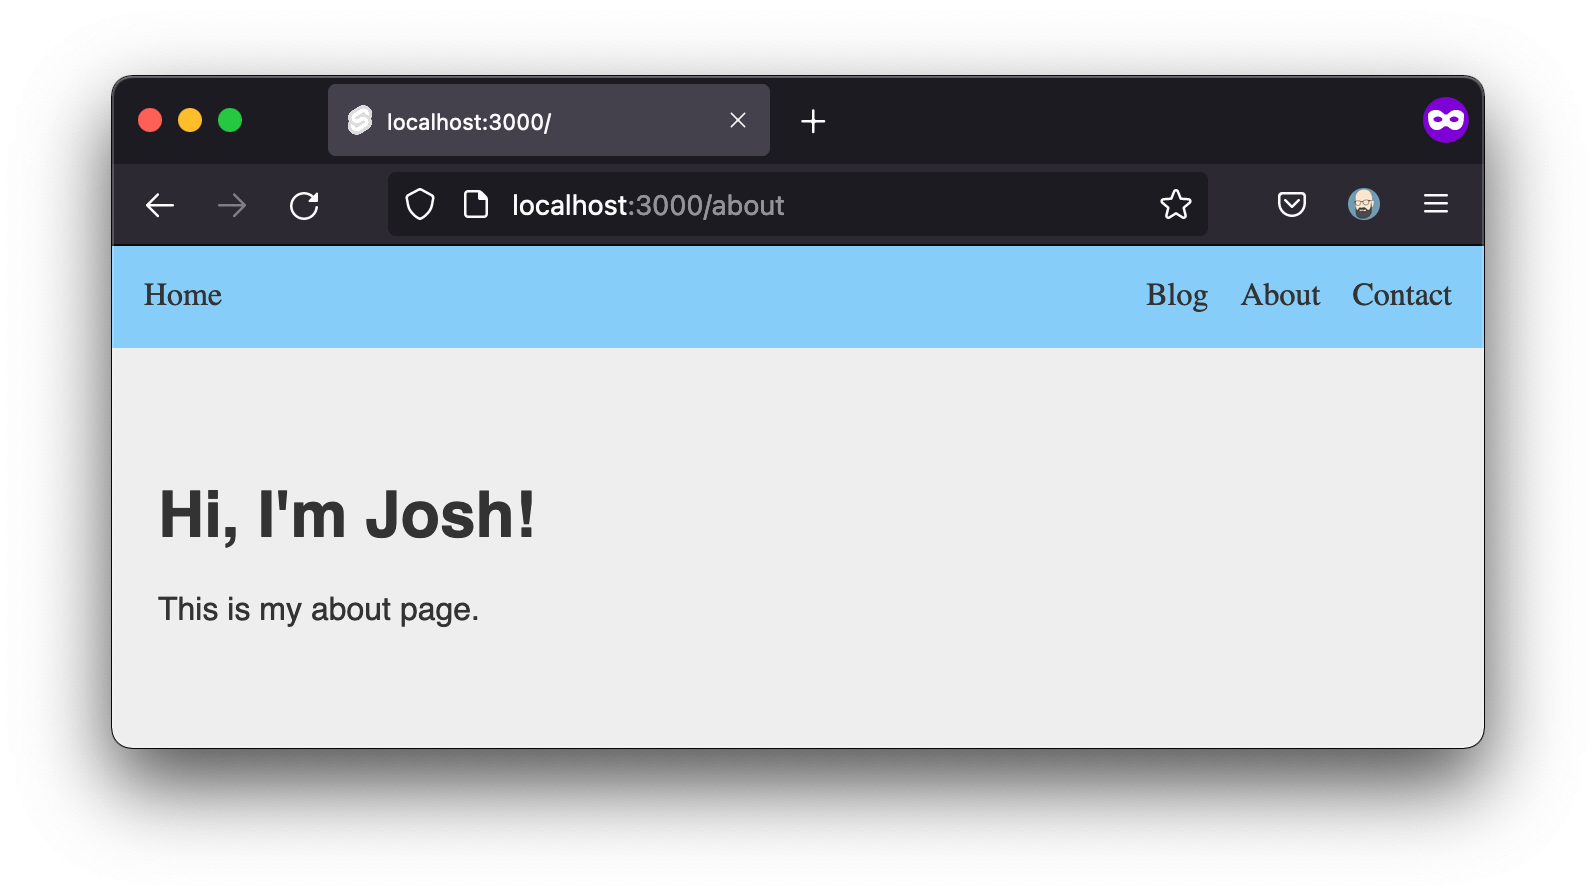
Since SvelteKit is server-rendered, if you view the page source, you’ll even see our style has been added to the HTML, rather than being client-rendered. Neat!
Importing stylesheets in JavaScript files is not a web standard; it’s just supported by some bundlers and build tools.
Adding Sass to SvelteKit
One of the great things about Svelte is how comparatively easy it is to add external processors, thanks to svelte-preprocess.
svelte-preprocessautomatically transforms the code in your Svelte templates to provide support for TypeScript, PostCSS, scss/sass, Less, and many other technologies.
Our next step is to install both svelte-preprocess and sass, which we may as well do at the same time:
npm i -D svelte-preprocess sassAs of version 1.0, SvelteKit features vitePreprocess as an included alternative to svelte-preprocess.
While vitePreprocess ships with SvelteKit and is therefore a bit simpler to use, as of this update, it’s unfortunately not as capable as svelte-preprocess, and lacks a few features I consider indispensable, such as the global modifier for component styles. For that reason, I’ve left svelte-preprocess as the preferred option in this tutorial. You can read more about both preprocessers in the docs.
Modifying the Svelte config
Next, open the svelte.config.js file, found in the project root.
As the name implies, svelte.config.js is the home for, well, configuration. It’s where we’ll make any needed changes to SvelteKit’s options and compiler.
This change is minimal; we just need to import svelte-preprocess, and then add it to SvelteKit’s list of preprocessors.
// svelte.config.js
import sveltePreprocess from 'svelte-preprocess';

const config = {
	kit: {
		/* ...other kit options here already */
	},

	preprocess: [sveltePreprocess()]
};
Note that you’ll need to create the preprocess option; it’s not there by default. (We’ll add Markdown processing here later, too.)
Also note that you can pass an object with more granular options into the sveltePreprocess() function, but we won’t for now. It knows what to do with Sass by default, so no further customization is needed.
It’s worth mentioning the scss.prependData option, which allows you to automatically inject code at the start of any Sass processing (such as Sass variables or an @import). You can read more in the svelte-preprocess docs; I just wanted to mention it since it’s quite handy.
One more quick, important thing to know: you’ll want to stop and restart your dev server any time you make a config change.
Adding SCSS to component styles
Now that we’ve got both Sass and our preprocessor installed, you can use Sass inside any component’s <style> block just by adding a lang attribute, like so:
<style lang="scss">
	// We can write SCSS here!
</style>
Using global SCSS files
Linking to Sass files is actually exactly the same as linking to CSS files, like we’ve already covered. In fact, at this point, you could just rename the existing style.css file to style.scss. (You’ll need to update the import in our layout, too, but that’s it.)
<!-- +layout.svelte -->
<script>
	import '$lib/styles/style.scss';
</script>
Ok, we’ve gotten a pretty good idea of project structure and styling at this point. Let’s move on to the last big missing piece: support for Markdown.
Adding Markdown to SvelteKit with mdsvex
If you’ve heard of MDX (generally used in React-based projects), you could think of the curiously named mdsvex as the Svelte equivalent.
Anyway, mdsvex powers everything we might want to do with Markdown:
- mdsvex handles converting Markdown to HTML;
- It also allows Markdown files to be used as components; and
- Finally, mdsvex lets us use Svelte components inside Markdown.
First, install mdsvex:
npm i -D mdsvexNext, we’ll need to add mdsvex to our config. Open svelte.config.js, and modify the code like so:
// svelte.config.js
/* Other imports here */
import { mdsvex } from 'mdsvex';

const config = {
	kit: {
		/* Kit options here */
	},

	extensions: ['.svelte', '.md'],

	preprocess: [
		sveltePreprocess(),
		mdsvex({
			extensions: ['.md']
		})
	]
};
If you’d like to get into the details of that config:
- The
extensionsconfig property tells Svelte what types of files to treat as components (allowing them to be imported and used in the same way Svelte components are); - The
mdsvex()function preprocesses Markdown to HTML—but it only targets.svxfiles by default, so we modify that as an argument.
Reminder: be sure to restart your dev server after making config changes.
If you’re running into errors, double-check that everything installed properly, all the necessary imports are present in your config file, and there are no syntax errors in the config file.
Markdown pages
Because of the config changes we just made, Markdown files can now be imported and used just like Svelte components.
Just to try it out, create src/routes/uses/+page.md and throw some Markdown into it. You’ll be able to see your content by visiting /uses:
📂 src
┗ 📂 routes
  ┗ 📂 uses
    ┗  📜 +page.md
# Uses
**Here's some stuff I use**
- SvelteKit
- VS Code
- Emojis 😎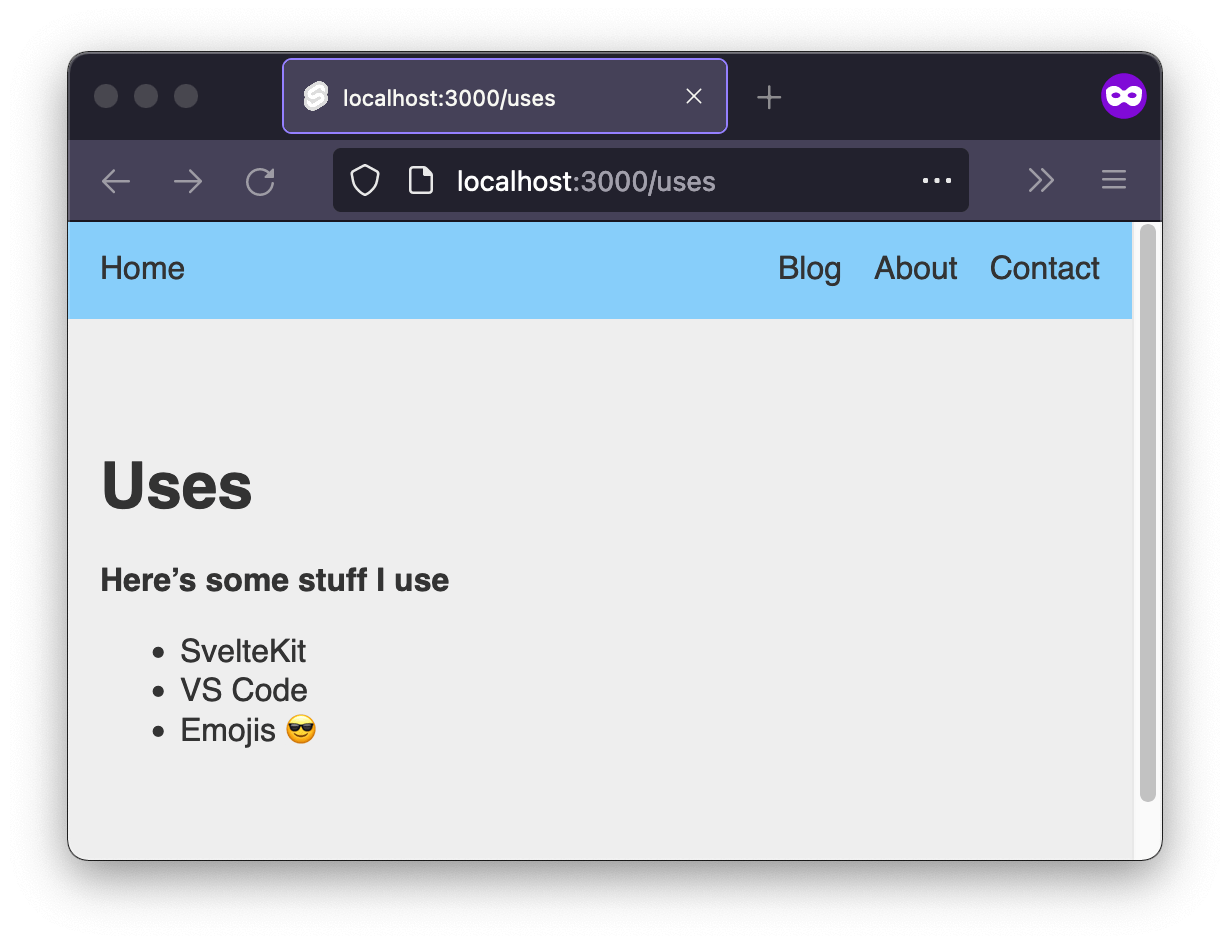
You can even import and use Markdown content inside of other files, if you want to—for example, if part of the page needed state or interactivity, but part could just be Markdown text.
This /uses page doesn’t have to be permanent, but keep it around for now; we’ll reference it again in a little bit. But first, let’s cover a couple other nice features of mdsvex.
Code blocks in markdown
Handily, mdsvex comes with prism.js pre-installed for code syntax highlighting. All you need to do is note the language (by adding it to the opening triple backticks), and mdsvex will process it appropriately.
```js
// JavaScript goes here,
// And will be syntax-highlighted!
```
All the code blocks on this website are made using this technique. And as a bonus: mdsvex even has svelte available as a language option!
Just note that you’ll need some CSS to handle the coloring, but many themes are available to either use as-is, or as a base for your own styles.
Using Svelte components in Markdown
As mentioned before: mdsvex allows you to use Svelte components inside of Markdown!
To do so, just drop in a script tag at the start of the content (after the frontmatter), and import the component within. You can then add the component to your Markdown just like you would anywhere else:
---
# frontmatter goes here
---

<script>
import SomeComponent from '$lib/components/SomeComponent.svelte'
</script>

# Markdown content here

<SomeComponent />

More markdown _here_!
As you might have already realized: this means you can even import Markdown files into other Markdown files!
Setting up the blog
Now that we have Markdown processing all set up, it’s time to get into the real meat of this tutorial, and begin setting up the blog.
First, though, we should talk about the various ways to approach loading blog posts, as there are a couple of options, both with considerable tradeoffs.
Two ways to load Markdown
Unfortunately, you can’t just drop Markdown files straight into the blog folder (like you used to be able to). Each post needs its own folder for the sake of routing, as we’ve seen. Every page on your site needs a corresponding +page file.
That’s the tradeoff with the new routing in SvelteKit (as of August 2022). Previously, a route could be either a standalone file, or a file inside a folder. That was convenient, and closely mirrored how routing works in most other frameworks. Now, however, every route needs its own folder (for the name), and its own +page file (for the content).
This leaves us with two possible approaches:
- Create an individual folder for each post (where the name of the folder is the post slug, and the actual post markdown file name is always
+page.md):
📂 src
┗ 📂 routes
  ┗ 📂 blog
    ┣ 📂 1
    ┃ ┗ 📜 +page.md
    ┣ 📂 2
    ┃ ┗ 📜 +page.md
    ┗ 📂 3
┗ 📜 +page.md- Throw all the Markdown files together in a single folder, and load all posts using a dynamic route (allowing the markdown files themselves to be named however you like and live alongside each other, but requiring a bit more config):
📂 src
┗ 📂 routes
  ┗ 📂 blog
    ┣ 📜 1.md
    ┣ 📜 2.md
    ┣ 📜 3.md
    ┗ 📂 [slug]
      ┗ 📜 +page.svelte
Note that in option 2, the posts could be anywhere; they wouldn’t need to be inside the blog folder, or even in src/routes/, because in option 2, the route that loads the posts is dynamic (one route file can load any number of Markdown posts).
Also note that in either of the above cases, the posts will load at the path /blog/1, /blog/2, etc.
I’ll cover both options here. If this is a new blog, or you have very few posts (and don’t mind an individual folder for each post) option #1 will be the simplest for you to get started with.
On the other hand, if you’ve got a bunch of markdown posts already (or hate the idea of your posts each needing their own folder), #2 will likely be the best solution, since #1 would mean lots of moving and renaming files.
Approach #1: individual post folders
If you don’t have a lot of Markdown posts already, or if you just want the simplest code, this is the path for you.
Set up your blog directories like this (assuming that 1 and 2 are the slugs of your posts):
📂 src
┗ 📂 routes
┗ 📂 blog
┣ 📂 1
┃ ┗ 📜 +page.md
┗ 📂 2
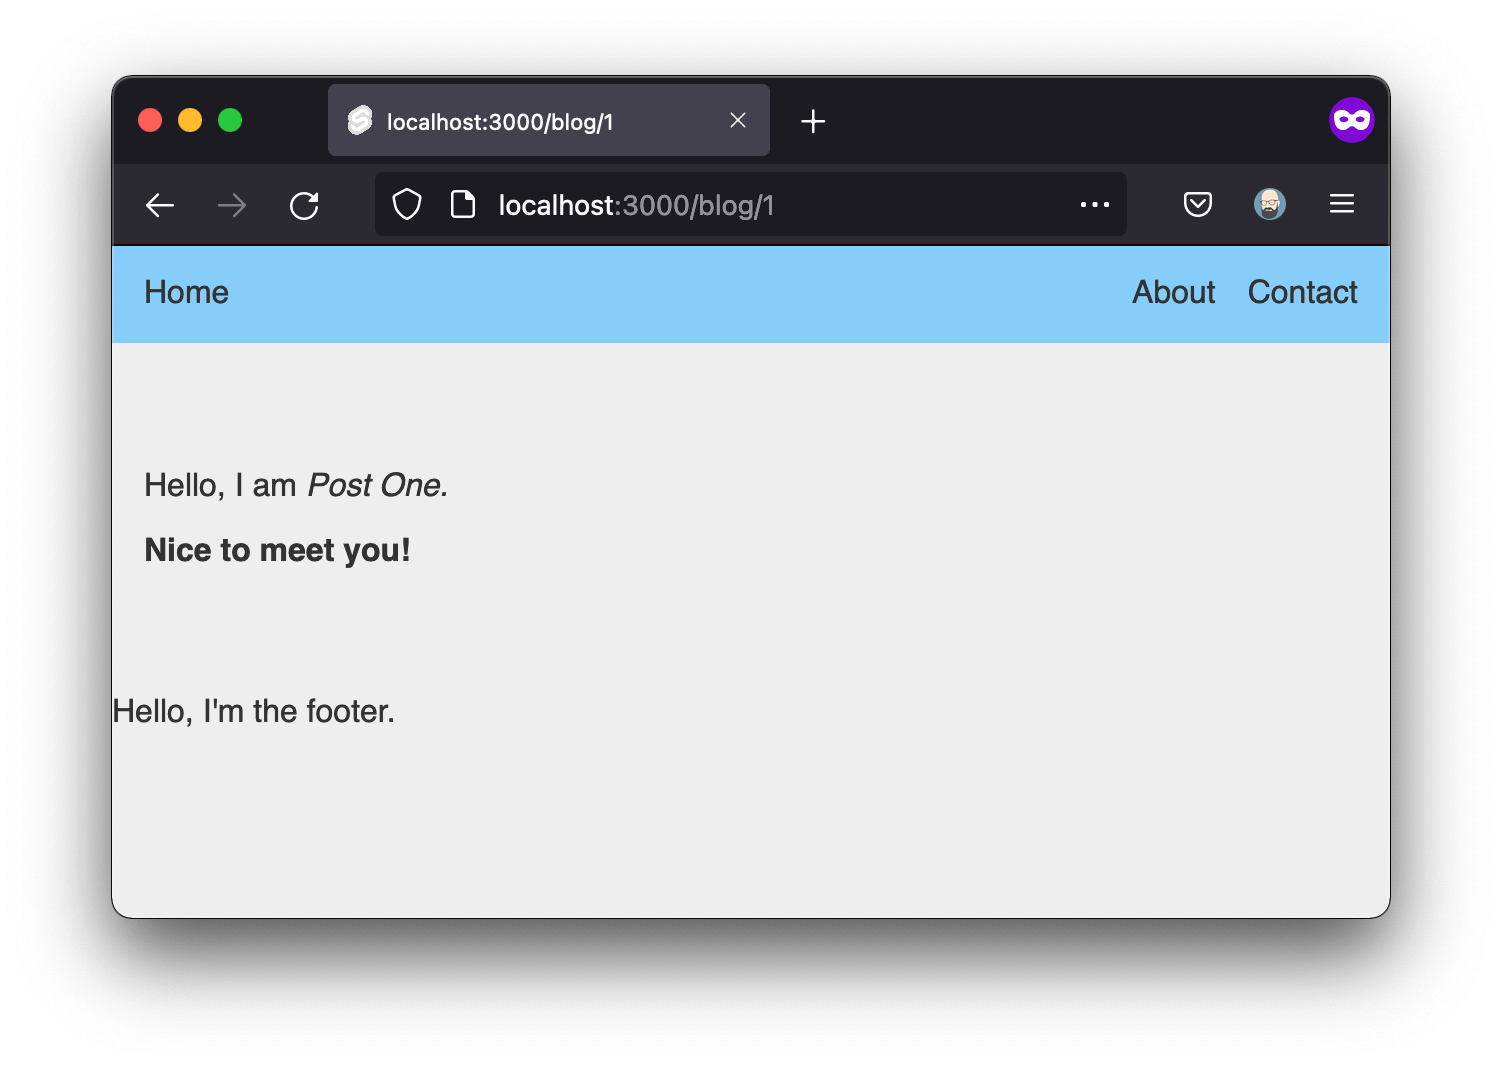
┗ 📜 +page.mdLet’s also go ahead and populate those files with a bit of content, just so we can get an idea of how this will all look and work. Something like this will do just fine:
---
title: Post One
date: '2021-12-14'
---

Hello, I am _Post One._

**Nice to meet you!**
The names and content aren’t important, but we will be using the title and date frontmatter properties later, so be prepared.
For now, though, you can visit /blog/x (where x is the slug of a blog post file) to see the post content live on the site:
Accessing frontmatter with approach #1
If approach #1 is your preferred path forward, this works fine so far. But you’ll still need a way to access your post’s metadata fields (i.e., the frontmatter at the top of the file).
For this, we can use an mdsvex layout.
First, create a .svelte file to serve as the mdsvex layout. This file could go anywhere (and be named whatever you like), but I’ll call mine post.svelte, and colocate it with the blog posts:
📂 src
┗ 📂 routes
  ┗ 📂 blog
    ┣ 📁 1
    ┣ 📁 2
    ┗ 📜 post.svelte
The router will ignore post.svelte, even though it’s inside the routes folder, because it’s not a valid + file.
Just like our +layout.svelte file, this component will wrap posts, as a parent component, and slot the post in as its child. The difference is: it’ll work just on Markdown posts in the blog, not every route.
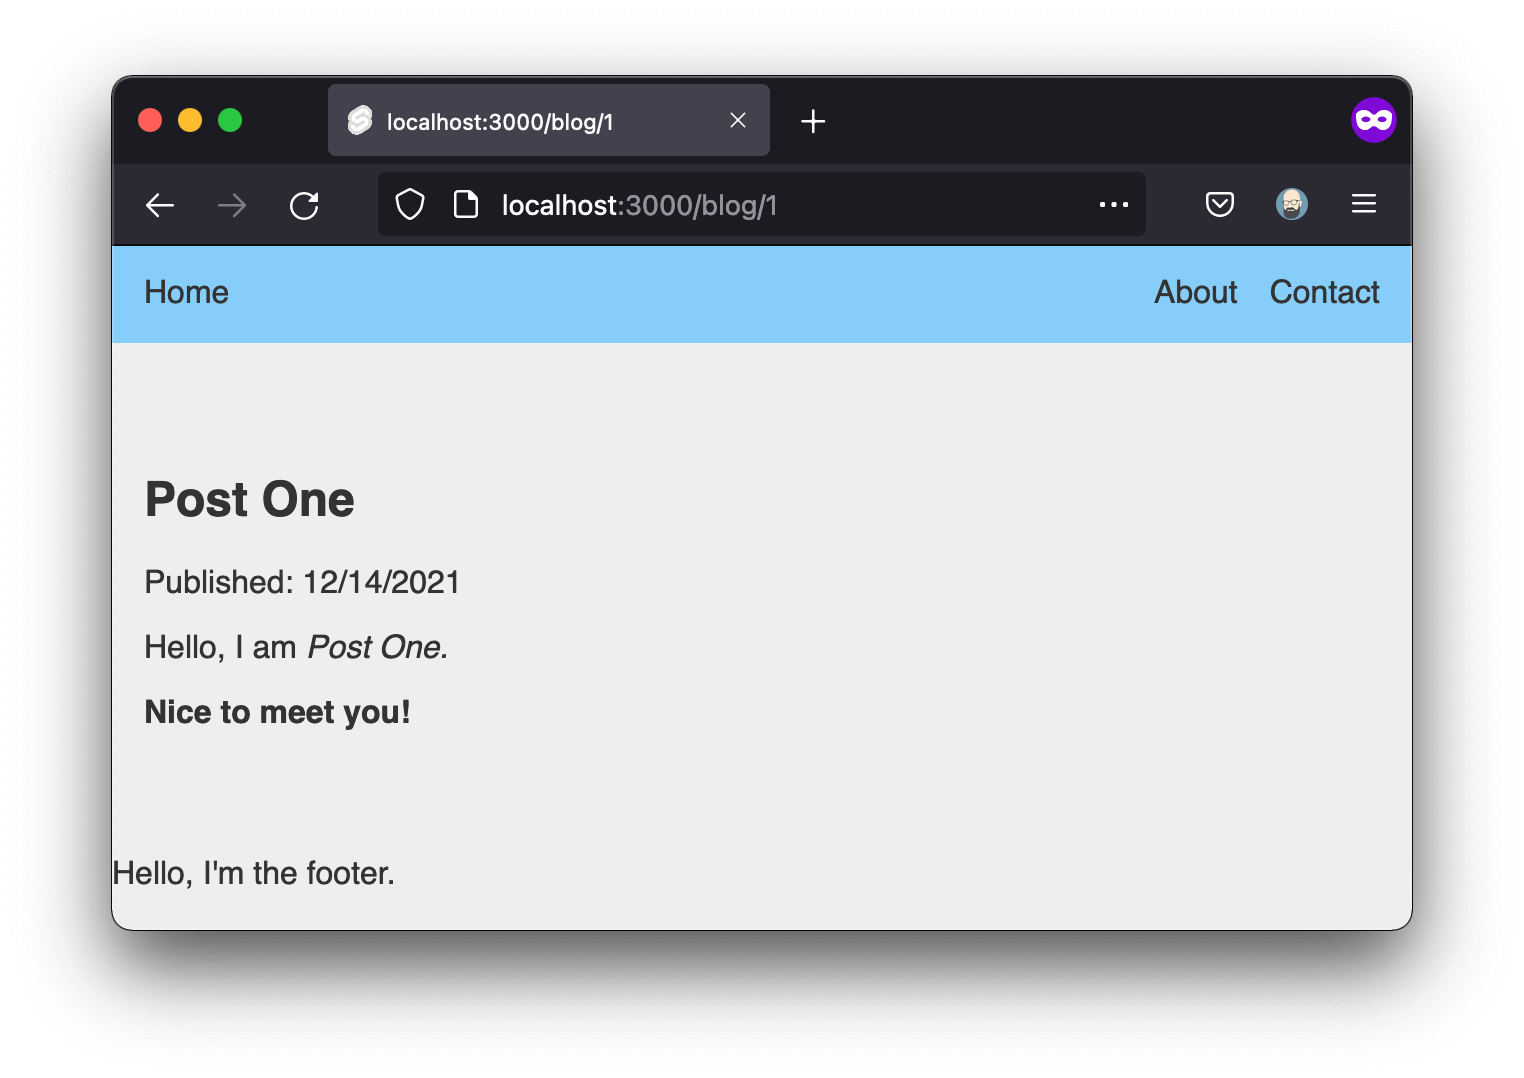
Inside our mdsvex layout file, all we need to do is export a prop for each frontmatter property we want to access, then use them in the template:
<!-- post.svelte -->
<script>
	export let title;
	export let date;
</script>

<article>
	<h1>{title}</h1>

	<p>Published: {date}</p>

	<slot />
</article>
There’s just one more thing to do: let mdsvex know about our layout.
Hop back to svelte.config.js, and inside the mdsvex object, add a layout property:
// svelte.config.js
const config = {
	// ...other properties here

	preprocess: [
		// ...other stuff here, too
		mdsvex({
			extensions: ['.md'],
			layout: {
				blog: 'src/routes/blog/post.svelte'
			}
		})
	]
};
mdsvex does some really nice magic for us with this approach. The blog key means the layout will only be used on Markdown files inside our /blog path. (Neat!) And the value is, of course, the file to use as the layout.
Once you’ve saved those changes (and possibly restarted your dev server), you should see the post content rendering properly when visiting a blog post slug.
You may notice, however, that if you revisit the /uses page, that layout will not be applied. That’s because, again, the blog key scopes this layout to only Markdown posts in the /blog path! (And yes, that’s the only reason I wanted you to keep the uses page around. Feel free to delete it, or if not, to add it to the main nav.)
That’s approach #1 to rendering Markdown posts. It’s the simplest, code-wise, and if you’re happy with this approach, you don’t need to do anything more as far as your blog is concerned.
However, I personally prefer option #2 (i.e., using a dynamic route). This allows all the Markdown blog posts to live together, side-by-side, in the same folder. It also makes loading all the posts (for our API endpoint that we’ll build later) much easier, and allows us to name the individual Markdown files whatever we want, without the clutter of a whole new folder and +page.md file for every single post.
So, while you can leave things as they are if you like, I’m going to be exploring the other approach for the rest of this tutorial. I’d encourage you to at least read approach #2, as it covers some other important fundamentals of SvelteKit routing.
Approach #2: dynamic routes
As mentioned: we could have a folder inside of src/routes/blog for each and every blog post. That would be tedious, though, and a lot of files to manage.
So instead, we’ll just drop all our markdown files inside src/routes/blog, and use a single dynamic route to render them!
In the process, we’ll learn about several new aspects of SvelteKit routing.
To start, let’s dump all our Markdown posts into the blog folder:
📂 src
┗ 📂 routes
  ┗ 📂 blog
    ┣ 📜 +page.svelte
    ┣ 📜 1.md
    ┗ 📜 2.md
We created the Markdown files at the beginning of approach #1. If you skipped that, either go back to that section, or just create them now, and make sure they have title and date frontmatter properties.
Notice at this point, /blog/1 and /blog/2 won’t load. That’s because every route on our site needs a +page.svelte (or other valid + file) to render.
You could also create a subfolder for your Markdown posts, or even put them somewhere else entirely, if you like. Anywhere is fine; I just chose the simplest path. If you change their location, just be sure to adjust the file paths in the code.
So how do we load a given post’s content? Well, that’s where we (finally) get around to dynamic routes!
Create a [slug] folder inside src/routes/blog (including the brackets in the name of the folder).
📂 src
┗ 📂 routes
  ┗ 📂 blog
    ┣ 📜 +page.svelte
    ┣ 📜 1.md
    ┣ 📜 2.md
    ┗ 📂 [slug]
The brackets ([]) indicate this route is dynamic; it will be used to match any /blog/* path (except the root /blog page, which of course is handled by the +page.svelte file).
In other words: we don’t know what the slug part is gonna be, but we know it’s gonna be something, and this folder will handle it.
In order to do that handling, however, we’ll need to lean on the load function.
Preloading page data server-side
In addition to +page.svelte—which, as we’ve seen, renders a given route’s content—SvelteKit offers us an additional +page.js file, which preloads on the server before the page renders. It also runs on the client, for hydration purposes (if needed)!
Let’s back up and explain that a little more:
Every time you load a route in SvelteKit (/blog, for example), the router looks for a +page.js file at that route.
If that file exists (and exports a load function, as it should), SvelteKit will run that function on the server before rendering the +page.svelte route, and will pass any data returned along to the +page.svelte file.
In other words: +page.js runs first, then passes anything it needs to on to the +page.svelte template file to render.
Here’s an illustration:
📂 src
┗ 📂 routes
  ┗ 📂 any-route
    ┣ 📜 +page.js -- Preloads data
    ┗ 📜 +page.svelte -- Renders the page
If you prefer TypeScript, you can use a .ts file instead of .js.
Since we’re doing some dynamic things, we’ll need to lean on the preloading capabilities of +page.js. So let’s create that file now:
📂 src
┗ 📂 routes
  ┗ 📂 blog
    ┗ 📂 [slug]
      ┗ +page.js
Inside +page.js, we’ll just need to export a load function that returns data for the template to use. Minimally, here’s what that should look like:
// src/routes/blog/[slug]/+page.js
export async function load({ params }) {
	const post = await import(`../${params.slug}.md`);
	const { title, date } = post.metadata;
	const content = post.default;

	return {
		content,
		title,
		date
	};
}
Let’s go through that code quickly, to understand what it’s doing:
Most importantly:
+page.jsexports aloadfunction that attempts to load the Markdown file corresponding to the current route.- By the way,
params.slugis called that because we named our route[slug]. If we had named our dynamic route, for example,[pizza], we would reach forparams.pizzainstead.
- By the way,
Once we’ve got that file loaded asynchronously, we destructure and
returnwhat we plan to use. (This will be available to us in our template, which we’ll see in a moment.).metadatacontains all the post’s frontmatter properties, and.defaultcontains the content itself.We wouldn’t have to return individual frontmatter fields like this; we could just return the whole post. But I like to destructure a bit on the server, to keep the template file cleaner.
Ideally, we’d wrap this all in a
try/catchblock in case something went wrong, but this is the minimal working model.
That in place, we can create a +page.svelte file alongside our +page.js file. We’ve loaded our data; now we’re ready to use it.
📂 src
┗ 📂 routes
  ┗ 📂 blog
    ┗ 📂 [slug]
      ┣ +page.js
      ┗ +page.svelte
Inside +page.svelte, we need very little code to finish the job!
The data from the load function in +page.js is automatically available to use as the data prop. So all we need to do is export that prop (so it gets passed in), and then use it!
<!-- src/routes/[slug]/+page.svelte -->
<script>
	export let data;
</script>

<article>
	<h1>{data.title}</h1>
	<p>Published: {data.date}</p>
	<svelte:component this={data.content} />
</article>
That in place, now when we load a blog post, we should see everything!
In case you're not familiar, <svelte:component /> is what's called a dynamic component; it renders an arbitrary Svelte component (provided as the this prop value), when the exact component isn't known beforehand. Perfect in this situation, because we aren't sure which post's content will need to be rendered.
Also: this works because earlier, we set .md files to be treated as components in our svelte.config.js file.
As an alternative syntax: we could destructure all the data props, and use them individually. That’s a little more setup, but it has the advantage of allowing you to use Content as its own component.
This is equivalent to the above:
<!-- Alternate approach! 👀 -->
<script>
	export let data;
	const { title, date, Content } = data;
</script>

<article>
	<h1>{title}</h1>
	<p>Published: {date}</p>
	<Content />
</article>
Which to use is up to you. I like the convenience of destructuring, personally, but it is also a little more boilerplate. They both work the same way.
If you go with the second option, note that the content/component name (Content, in this case) must be capitalized, to distinguish it as a component—both in the template and in the data returned from the load function.
All right, at this point, we’ve got a good handle on individual posts. Now, it’s time to build out the blog index page, where we’ll list all our posts. To do that—because we’ll likely want to list posts in multiple ways in various places—we’ll build out an API endpoint for posts.
SvelteKit server routes
Up until now, every route we’ve created has been a page. But SvelteKit offers another type of route, too: server routes (which you can think of as API endpoints).
There are just three important conventions to follow when creating a server route (which, again, are analogous to API endpoints):
- A server route file must be named
+server.js; +server.jsshould export a function named for each HTTP verb it responds to. (This will often just be aGETfunction, but you can also usePOST, etc.);- Server routes must return a new
Response. (Here’s the Response web spec.)
As an example: if you made src/routes/api/+server.js and put a GET function inside it, any GET request to /api would invoke that function.
Why a server route? Because we might have other places in our app we want to access these posts, too. Odds are, we’ll have more than one place where accessing all our posts is handy, and having an endpoint reduces the overhead of rewriting that code.
Anyway, there’s more detail in the server route docs, but it’s less complicated than it sounds, so let’s dive in.
Creating an endpoint for our posts
Since we might decide to add more endpoints later, let’s create a src/routes/api folder. Inside it, we’ll add a posts folder, and finally, inside that, our +server.js file, which will actually do the work of returning posts.
📂 src
┗ 📂 routes
  ┗ 📂 api
    ┗ 📂 posts
      ┗ 📜 +server.js
Inside this new file, we’ll need to export a GET method (since “get” is the HTTP verb we’ll accept; this endpoint will only return data, not accept it).
Let’s do a quick test, just to see it in action:
// +server.js
export const GET = () => {
	return new Response('Welcome to my API');
};
With that in place, we should be able to visit /api/posts and see the following (unimpressive, but neat!) text loaded in the browser:

How cool is it that!? Our API route doesn’t return anything useful just yet, obviously, but it’s still pretty awesome to have it up and running that easily!
While we won’t add it here, there are parameters available inside the GET function, which expose headers, query parameters, and other info about the request.
Writing a utility to fetch posts
The next step is to actually fetch Markdown files. I think it’s handy to use a helper function for this—one which we can import and reuse in multiple places. That’s because we will reuse it, but also, it just makes the code a little cleaner.
Let’s make a src/lib/utils folder, and add an index.js file to it.
📂 src
┗ 📂 lib
  ┗ 📂 utils
    ┗ 📜 index.js
Inside our new JS file, we’ll export an asynchronous fetchMarkdownPosts function. Its job is to grab all our Markdown files and return their data. We’ll be leaning directly on Vite for that (the build tool that powers SvelteKit under the hood).
export const fetchMarkdownPosts = async () => {
	const allPostFiles = import.meta.glob('/src/routes/blog/*.md');
	const iterablePostFiles = Object.entries(allPostFiles);

	const allPosts = await Promise.all(
		iterablePostFiles.map(async ([path, resolver]) => {
			const { metadata } = await resolver();
			const postPath = path.slice(11, -3);

			return {
				meta: metadata,
				path: postPath
			};
		})
	);

	return allPosts;
};
If you followed approach #1 above and have every post inside its own individual folder, you'll need to change the import path to end /blog/**/*.md, to go one level deeper.
There’s a lot going on in that file. Let’s break it down:
import.meta.globis a Vite function. It imports any files that match the glob (wildcard string) provided—in this case, all.mdfiles insidesrc/routes/blog.- That function returns an object where each file’s relative path is the key, and the value is a “resolver” function (my term; not official) that loads the file contents as a JavaScript promise.
- The
mapmethod is there just to shape each file’s data, so it’s easier to work with. - And since each item waits for a promise, we wrap all that in an
await Promise.all.
One last thing to note: the file path is different than the actual route. For example:
- This file:
/src/routes/blog/post-title.md - Loads at:
/blog/post-title
So to extract the proper link from the file path, we need to do some trimming.
Since we know for sure every post’s file path will begin with /src/routes and end with .md, we can safely use .slice(11, -3) to remove those characters—the first eleven and last three—and end up with the actual relative path. (You could also use .replace or regex to be a little more explicit, but since we already know the exact string we’re working with, I don’t see the point. .slice works just great.)
Returning posts from a server route endpoint
Now that we have a handy helper to get our Markdown post data for us, the next step is to return that data in an API endpoint.
Inside our +server.js file from above, we’ll put the following code:
// src/routes/api/posts/+server.js
import { fetchMarkdownPosts } from '$lib/utils';
import { json } from '@sveltejs/kit';

export const GET = async () => {
	const allPosts = await fetchMarkdownPosts();

	const sortedPosts = allPosts.sort((a, b) => {
		return new Date(b.meta.date) - new Date(a.meta.date);
	});

	return json(sortedPosts);
};
That might look like a lot, but when you consider it’s actually everything we need to create an API endpoint to return all our site’s posts, sorted by date, it’s kind of remarkable!
Let’s go over what’s happening in that code:
- First, we import and use the
fetchMarkdownPostshelper function we created above, to return all the Markdown post data. - We also import the handy
jsonhelper from SvelteKit. It handles converting the data to JSON and setting the proper headers for us automatically! - Next, we sort the posts by descending date, since we’ll want our newest posts showing first. (You could sort the posts in the helper, but in my opinion, logic belongs in the endpoint.)
- Finally, we
returnthe finished product inside thejson()function.
Let’s try it out! Refresh your /api/posts path now, and you should see some real data!
Even cooler: this endpoint will update automatically with each Markdown post we add! Drop a new .md file in, and it’s part of the endpoint.
Ideally, you’ll probably want to add try/catch blocks to that code, in case anything goes wrong while loading the endpoint.
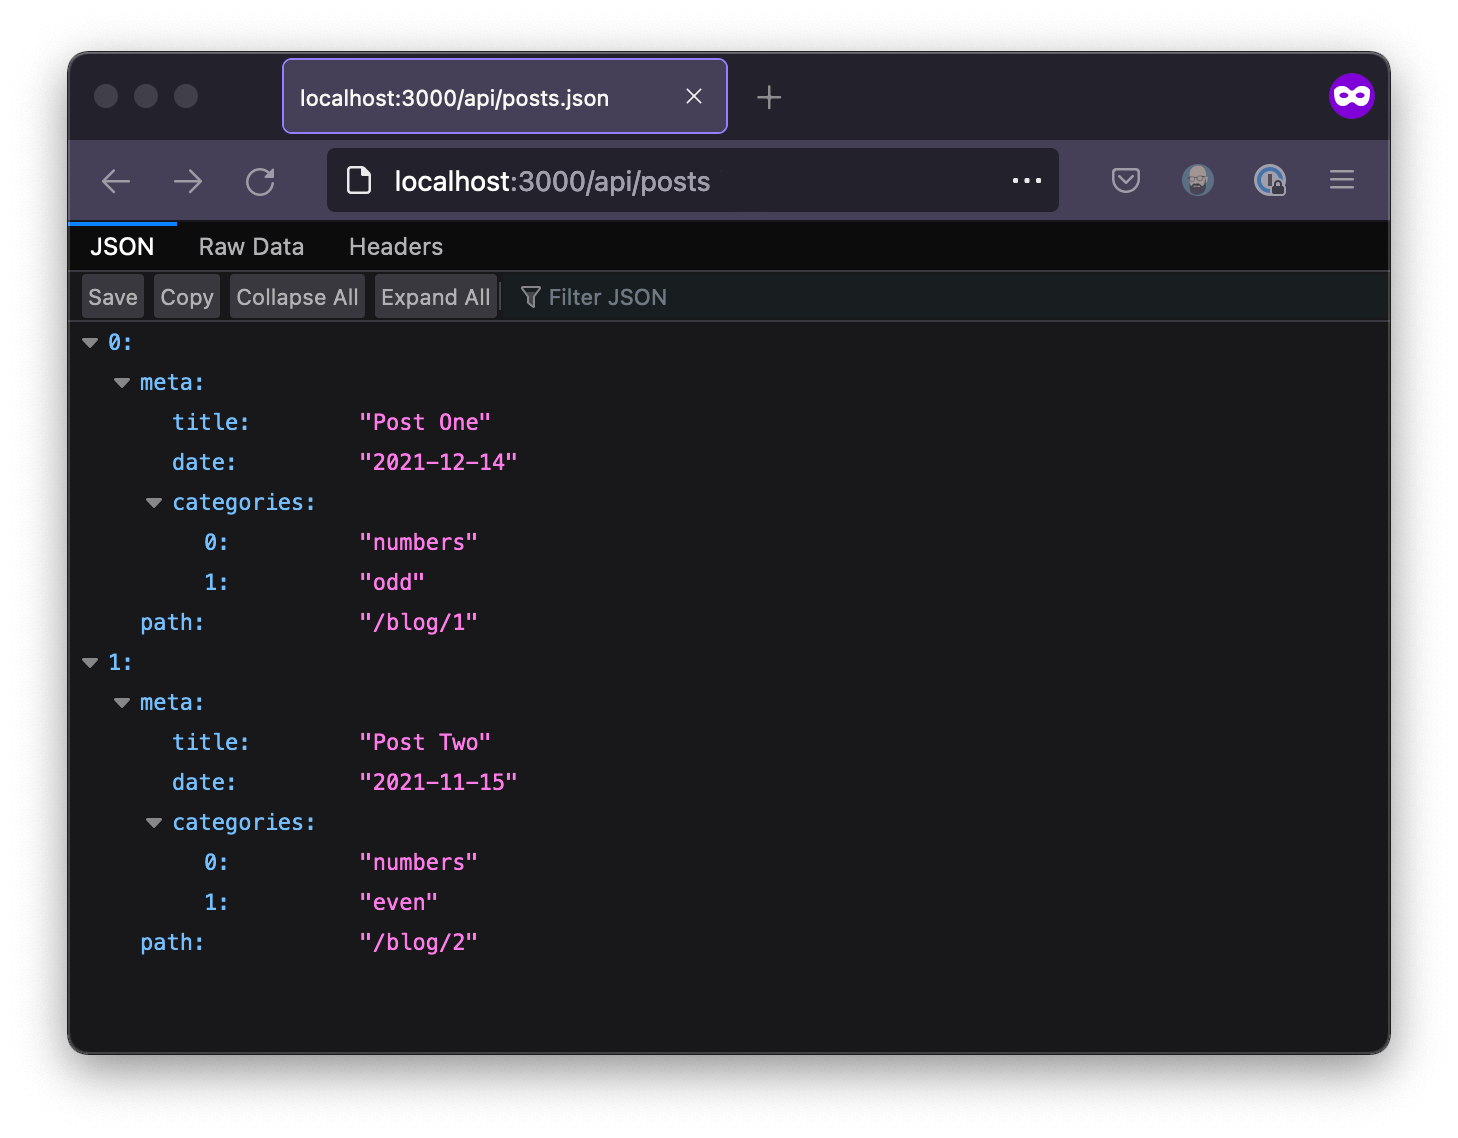
Also: you might notice my screenshot has categories, too. Don’t sweat that for now.
Finishing the blog index page
Now that we have an endpoint for all our posts, building out our blog index page will be a piece of cake!
We could do the loading client-side, with a fetch call in an onMount function. That would work. But it would also result in a loading state with no visible content, which isn’t a great user experience. So instead, let’s use SvelteKit’s built-in server-side rendering.
Server-side post fetching
Remember how we can add a +page.js file alongside our +page.svelte files, which pre-runs a load funcion? Well, that makes it perfect for fetching API data, such as our blog posts!
Other important things to know about the load function:
- It has contextual access to a few special arguments. These include:
urlandparams, which contain info about the request; andfetch, which is a helper to normalize thefetchimplementation (since it differs between the browser and Node)
loadshould return an object. It doesn’t matter what’s in the object, but the whole thing will be available for you to use asdata.+page.jsruns both server-side and client-side. That’s mostly unimportant when prerendering to static files, as we are. Still,loadshouldn’t reference environment-specific things, likewindoworprocess. (If you want to runloadonly on the server, use+page.server.jsinstead. Just note that it hasfetchavailable natively.)
// src/routes/blog/+page.js
export const load = async ({ fetch }) => {
const response = await fetch(`/api/posts`);
const posts = await response.json();
return {
posts
};
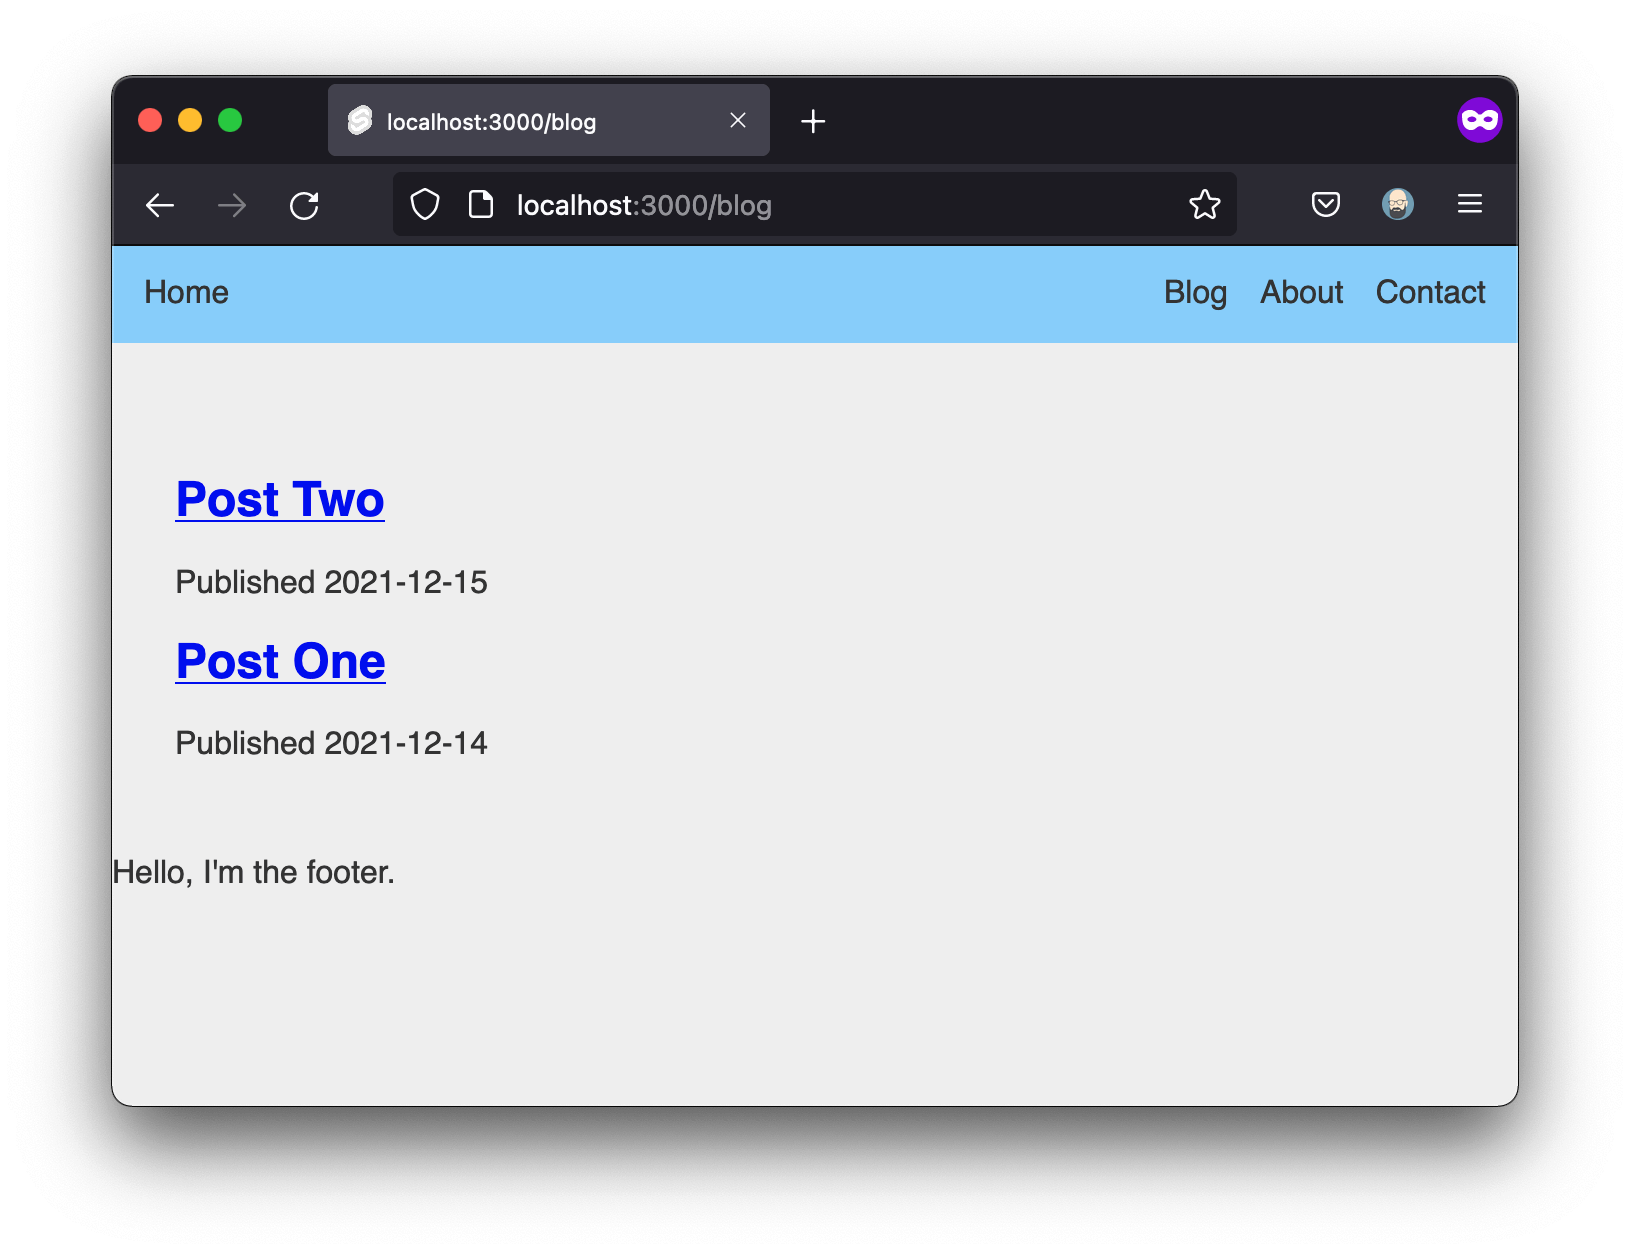
};That tiny bit of pre-loading handles everything we need! Now we’ve got a posts being passed to the component (again, as data), and we can use it to loop over and render posts in the corresponding +page.svelte file:
<!-- src/routes/blog/+page.svelte -->
<script>
	export let data;
</script>

<h1>Blog</h1>

<ul>
	{#each data.posts as post}
		<li>
			<h2>
				<a href={post.path}>
					{post.meta.title}
				</a>
			</h2>
			Published {post.meta.date}
		</li>
	{/each}
</ul>
The HTML in the above example is a bit simple (and doesn’t properly account for a scenario in which there are no posts to display), but hopefully you get the gist. You may want to add other code, based on the frontmatter in your own blog posts. (One thing definitely missing is a featured image/image URL, but you could also have excerpts or other content as well.)
Prerendering with the static adapter
SvelteKit is server-rendered by default. That’s great, because server-side rendering is generally better for performance, accessibility, and SEO. However, that also means static file prerendering (which is what we want) is opt-in.
You can manually make any page prerendered—handy for things like an “about” or “faq” page that won’t have any dynamic content. You can also prerender at the layout level, to handle whole directiries once. Either way, this is done by exporting a constant named prerender and setting it to true (see the docs).
However, if we want our entire site to be statically pre-rendered, it’s probably best to reach for SvelteKit’s static adapter. (That way, we don’t have to keep track of which routes are and aren’t set to pre-render based on code; they just will be, no matter what.)
SvelteKit has many adapters, and comes pre-installed with one that will automatically detect and build properly for Netlify, Vercel, or Cloudflare Pages—which is both handy and impressive! But for static pre-rendering, we want adapter-static.
npm i -D @sveltejs/adapter-staticOnce installed, we have to make a couple small changes to prerender all of our pages.
First, inside of svelte.config.js, change adapter-auto to adapter-static (in the import near the top of the file):
// Replace the original `adapter-auto` line with this in svelte.config.js
import adapter from '@sveltejs/adapter-static';
And second, we’ll need to tell all of our routes to prerender, by exporting a prerender prop and setting it to true.
You could do this manually for every page, but that would be tedious. The much easier way to do it is to create a +layout.js file in src/routes, and add the prop there. (Note: this is a .js file, not our existing +layout.svelte file; it handles pre-loading, not rendering.)
// src/routes/+layout.js
export const prerender = true;
Just as the +layout.svelte file handles layout on every page, the +layout.js file handles server-side scripting for every page. By setting our exported prerender prop inside of the layout JS file, it will “trickle down” to every page, saving us the trouble of manually setting it on any child route.
You can check out the adapter-static readme for more if you like.
With our adapter installed and in use in our config file, every page on our site will be pre-rendered as static HTML at build time! You can even view source in the browser to confirm that the site is now served as pre-rendered HTML.
One of the great things about SvelteKit’s static mode is that it pre-renders all your pages as static HTML, but also loads some client-side JavaScript to help with navigation and preloading in the background. This way, the site works just fine without JavaScript, but is progressively enhanced.
If you’d like to disable this behavior—to ship less JS, at the potential cost of a slightly less smooth navigating experience—you can add export const csr = false to your +layout.js file.
One final note: you wouldn’t have to use the static adapter at this point. You could just skip that part and go with the default adapter. That would allow you to deploy the site to Netlify, Vercel, or Cloudflare Pages, and the site would be server-rendered using serverless functions, instead of statically pre-generated.
Both would work great, and which to go with depends mainly on your site and its needs. I just bring it up because it’s awesome that SvelteKit can completely transform from one thing to another simply by swapping out the adapter.
Optional finishing touches and extra features
At this point, our blog is up and running. You could take it and run with it in its current shape, and begin adding your own styling and customizations.
However, what we have is basic and there some extra enhancements we may want to make.
Add dynamic post category pages
Many blogs use taxonomies like categories and tags to let the user sort and view posts. SvelteKit lets us accomplish this with dynamic pages.
Dynamic pages are useful because we might want one template file to handle any number of potential routes. In our case, we’ll have one file to handle any /blog/category/* route, no matter what the * might be.
To start, if you don’t already have some categories in your posts’ frontmatter, it’s a good idea to add some now. I did this, just for the sake of example:
## <!--- 1.md -->

categories:

- "numbers"
- "odd"

---
## <!--- 2.md -->
categories:
- "numbers"
- "even"
---From here, we’ll do much the same as we did with the dynamic [slug] path earlier. So, for categories, we’ll add a category/[category] route in src/routes/blog.
📂 src
┗ 📂 routes
  ┗ 📂 blog
    ┗ 📂 category
      ┗ 📂 [category]
        ┣ +page.svelte
        ┗ +page.js
A reminder: the word category isn’t special; it’s just a variable. But as with any variable, it’s good to name it semantically. We’ll access params.category inside +page.js.
Once you’ve created those, you may notice you can actually visit /blog/category/ followed by any text, and you won’t get a 404. The dynamic route handles all unmatched /blog/category/* routes. The trick now is just to load the right content based on the route.
Just to get an idea of what we’re working with, let’s start with any JavaScript developer’s best friend: console.log, inside of +page.js and its load function.
// src/routes/blog/category/[category]/+page.js
export const load = ({ params }) => {
	console.log(params);
	return {};
};
Notice if you load a blog category page now, you can see params in the browser console, as well as in the terminal where your local dev server is running. Try visiting /blog/category/numbers and you should see:
{ category: 'numbers' }Knowing that the current /blog/category/* route will be available as params.category, we can get to work. We’ll use that, and our existing API endpoint, to filter posts. Let’s modify our +page.js file:
// src/routes/blog/category/[category]/+page.js
export const load = async ({ fetch, params }) => {
	const { category } = params;
	const response = await fetch(`/api/posts`);
	const allPosts = await response.json();

	const posts = allPosts.filter((post) => post.meta.categories.includes(category));

	return {
		category,
		posts
	};
};
That bit should return us just the posts that match the current category!
I won’t go into how to render the matching content, but it’s almost identical to how we did it in src/routes/blog/+page.svelte. (In fact, you could easily create a component to handle listing posts, and reuse it in both places!) Here, however, you’ll probably want to use the category itself, to show the user what they’re looking at.
Also: it’s probably a good idea to wrap that code in a try/catch block—and for that matter, to anticipate situations where no posts will match the given category, and handle that properly in the UI. (An {#if posts.length} block with an {:else} should do the trick.)
Elsewhere, inside the [slug]/+page.svelte template, listing a post’s categories just requires grabbing the prop and looping over it. (Just be sure to add categories to the returned object from the corresponding [slug]/+page.js file—or, if using an mdsvex layout, to the layout’s exported props.)
<!-- src/routes/blog/[slug]/+page.svelte -->
<script>
	export let data;
</script>

<!-- ...Post HTML here -->

{#if data.categories.length}
	<aside>
		<h2>Posted in:</h2>
		<ul>
			{#each data.categories as category}
				<li>
					<a href="/blog/category/{category}">
						{category}
					</a>
				</li>
			{/each}
		</ul>
	</aside>
{/if}
Finally, if you really wanted to go the extra mile, you could add a +page.svelte file inside src/routes/blog/category/, to display all categories. I won’t go into that here, since it’s an additional feature that won’t benefit all blogs, however.
Implement page transitions
If you want to get fancy, adding a page transition in SvelteKit is pretty simple!
To start, add a +layout.js file alongside the +layout.svelte file.
Just as +layout.svelte renders every page on the site, +layout.js loads on every page.
Inside +layout.js, we just need to export a simple load function that passes along the current route:
// src/routes/+layout.js
export const load = ({ url }) => {
	const currentRoute = url.pathname;

	return {
		currentRoute
	};
};
That handled, we can use the route inside the +layout.svelte file:
<!-- src/routes/+layout.svelte -->
<script>
	// ...Other imports here
	import { fade } from 'svelte/transition';

	export let data;
</script>

<Header />

{#key data.currentRoute}
	<main in:fade={{ duration: 150, delay: 150 }} out:fade={{ duration: 150 }}>
		<slot />
	</main>
{/key}- We’ll use
fadefrom the Svelte transition library as our transition, though you could choose another if you like. The main thing is just to adddelayto theintransition, so it doesn’t start before the old page is done transitioning out. - That done, we’ll wrap the page contents in a
#keyblock.
#key block takes an expression, and automatically re-renders its contents whenever that expression changes.In this case, that will be the current page route, so that we can re-render the page itself every time the route changes.
That’s all it takes! Transitions are an incredibly powerful part of Svelte, and the svelte/transition library offers several options besides fade. Feel free to play around with them.
Add an RSS feed
Server routes don’t have to return JSON; they can return other data, too, including XML. This handy fact makes it dead simple to implement an RSS feed on our blog!
To start, create an rss/+server.js file in your src/routes folder, to make the RSS feed available at the route /rss.
📂 src
┗ 📂 routes
  ┗ 📂 rss
    ┗ 📜 +server.js
Inside that file, we’ll use our fetchMarkdownPosts helper again, and convert it to XML.
import { fetchMarkdownPosts } from '$lib/utils';

const siteURL = 'https://your-domain.tld';
const siteTitle = 'Your site title here';
const siteDescription = 'Your site description here';

export const prerender = true;

export const GET = async () => {
	const allPosts = await fetchMarkdownPosts();
	const sortedPosts = allPosts.sort((a, b) => new Date(b.date) - new Date(a.date));

	const body = render(sortedPosts);
	const options = {
		headers: {
			'Cache-Control': 'max-age=0, s-maxage=3600',
			'Content-Type': 'application/xml'
		}
	};

	return new Response(body, options);
};

const render = (posts) => `<?xml version="1.0" encoding="UTF-8" ?>
<rss version="2.0" xmlns:atom="http://www.w3.org/2005/Atom">
<channel>
<title>${siteTitle}</title>
<description>${siteDescription}</description>
<link>${siteURL}</link>
<atom:link href="${siteURL}/rss.xml" rel="self" type="application/rss+xml"/>
${posts
	.map(
		(post) => `<item>
<guid isPermaLink="true">${siteURL}/blog/${post.path}</guid>
<title>${post.meta.title}</title>
<link>${siteURL}/blog/${post.path}</link>
<description>${post.meta.title}</description>
<pubDate>${new Date(post.meta.date).toUTCString()}</pubDate>
</item>`
	)
	.join('')}
</channel>
</rss>
`;
Please note that the above code block will need some modification! The example above is more or less straight from this site, and may not be the right shape for your needs. At the very least, you’ll need to replace the URL and text placeholders, but you may also need to update the routes and the post frontmatter properties being referenced.
I pulled my example from this guide and this one, for reference. And if you want to make sure you’ve done it correctly, here’s an online XML validator.
Notice the export const prerender = true line. The feed will work when developing regardless, but that prop is necessary to get the RSS feed to prerender when building the site.
Add heading links with rehype
It’s nice to let users link directly to a section of a post. Manually adding links to all our headings would be tedious, however, and goes against the point of writing in Markdown.
Luckily, mdsvex allows us to use many rehype plugins to add extra features to markdown processing, and so we can make this all happen automatically with just a bit of config adjustment.
Rehype is an HTML parser, and not specific to Svelte or mdsvex; it’s commonly used in a wide range of projects.
There are two rehype plugins we’ll want specifically:
rehype-slug, which automatically adds IDs to headings;rehype-autolink-headings, which (as you can guess from the name), automatically adds links to our headings.
Install them both like so:
npm i rehype-slug rehype-autolink-headingsThen we’ll pop open our svelte.config.js file, import our two new rehype plugins, and add them to the mdsvex config options object, like so:
// svelte.config.js
/* Other imports here */
import rehypeSlug from 'rehype-slug';
import rehypeAutolinkHeadings from 'rehype-autolink-headings';

const config = {
	/* Other config properties here */

	preprocess: [
		sveltePreprocess(),
		mdsvex({
			extensions: ['.md'],
			rehypePlugins: [rehypeSlug, rehypeAutolinkHeadings]
		})
	]
};

export default config;
Note that the plugins must go in that order! rehypeSlug adds IDs to our headings, and rehypeAutolinkHeadings only works on headings that have IDs.
(Fun fact: I discovered these two were in the wrong order on this site while writing this, when I suddenly realized it was only half working. Writing technical posts is a great way to find out how much you missed.)
With that in place, restart the dev server. Now pop open the inspector and check out an h2 through h6 generated from Markdown, and we’ll see some additions:
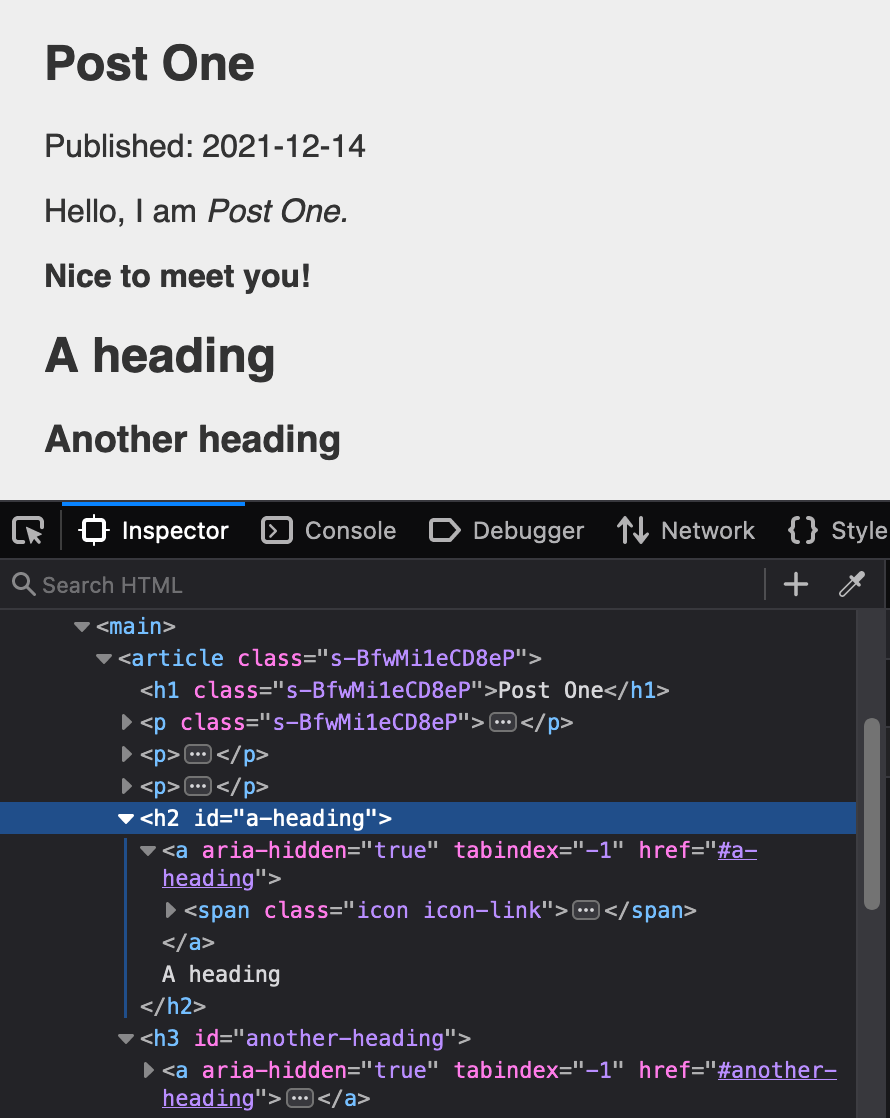
However, we’ll need to add a bit of styling to make the links show up properly.
The .icon.icon-link class is a Font Awesome convention, so it doesn’t mean or do anything in our project by default.
How you choose to handle this is personal preference, but this block of Sass should basically do the trick:
:where(h2, h3, h4, h5, h6) {
	.icon-link {
		position: relative;

		&::before {
			content: '#';
			position: absolute;
			left: -1ch;
			top: 0;
			line-height: 1;
			opacity: 0;
			text-decoration: underline;
		}
	}

	&:hover .icon-link::before {
		opacity: 1;
	}
}
That CSS will make a pound sign (or hash, or “octothorpe,” if you’re fancy) appear whenever the user hovers on a heading with a .icon-link in it:

Thanks to how CSS treats pseudo elements, that icon is fully clickable as part of the link, to navigate directly to the heading in question.
Please be aware that while this example is ok, hovering is not an intuitive gesture on touchscreen devices. It’s probably better to always show some indication of the link.
You could also add some JavaScript to handle automatically copying the link to the clipboard (probably with some JavaScript inside a Svelte component’s onMount function), but I’ll leave that detail up to you. For now, our links are at least present and working, even if they might not be ideal yet.
Add autoprefixer with PostCSS
Since we’re already using svelte-preprocess, adding autoprefixer to our toolchain is as simple as installing it, and adding it in our config file:
npm i -D autoprefixerThen add it in the sveltePreprocess() function arguments:
// svelte.config.js

/* Other imports here */
import autoprefixer from 'autoprefixer';

const config = {
	/* Other config options here */
	preprocess: [
		sveltePreprocess({
			postcss: {
				plugins: [autoprefixer]
			}
			/* Other sveltePreprocess options here, like SCSS */
		})
		/* Other preprocessors here, like mdsvex */
	]
};
That’s all we need to do! Autoprefixer is now working automatically to prefix any CSS properties that might need it for maximum backwards compatibility with other browsers.
As an added bonus, if you want to add any other PostCSS plugins, you can now do so in just the same way.
Add page head meta tags
Ideally, we’ll probably want to set up some stuff for the <head> on our various pages. For pages in general, but posts especially, it’s important to have the right title attributes, Open Graph info, share images, etc.
<svelte:head> component for adding HTML to the page head from anywhere.Add one somewhere in [slug]/+page.svelte (I like to put it just before the HTML, personally), and let’s add a title inside.
<!-- src/routes/blog/[slug]/+page.svelte -->
<svelte:head>
	<title>My blog - {title}</title>
	<meta property="og:title" content={title} />
</svelte:head>
You should now see the title showing up properly in the browser bar.
There are many other properties you might want to add here, especially if you’re trying to optimize your posts for share-ability. I won’t go into any more detail here, but it’s worth verifying all your pages and posts look good when shared with Open Graph checker tools (many are available online).
At this point, we should probably go through our pages and add <title> tags, etc. to them as well. For example:
<!-- about.svelte -->
<svelte:head>
	<title>About - Josh Collinsworth</title>
</svelte:head>

<!-- ...HTML here -->
Note also that SvelteKit offers several other similar elements, like <svelte:window> and <svelte:body>, where we need to tap into parts of our site or app normally outside the boundaries of our components.
Improve the posts API endpoint
The posts API is functional, but it can be improved in several ways.
For starters, we’ll definitely want to put the code we just wrote into a try/catch block that returns the proper status code when things go wrong. Some refactoring might also be in order. We’ll also probably want to add some other extra features to this API route eventually.
Another possible future enhancement would be adding the post’s content to the returned JSON, which we don’t do currently. The “resolver” function offers a default.render method for that, if you so choose. (We saw it previously, in the src/routes/[slug]/+page.js file.)
Customize the error page
What you’re looking at when you hit an error is SvelteKit’s built-in error component.
However, just like we can provide our own +layout.svelte file, we can also provide a +error.svelte file, to template and format any errors our users might run into.
I won’t go into detail here, but you can check the official Svelte docs error pages entry for more info.
Preload routes
SvelteKit is already fast, and when we pre-render our HTML like we are via the static adapter, it’s going to be blazing. But we can actually push the performance even further with SvelteKit’s built-in preloading.
preloadCode, and preloadData.To use them, just import them in a page or layout (our global layout file might be a good choice):
<script>
	import { preloadCode, preloadData } from '$app/navigation';
</script>
$app contains several modules available in SvelteKit for things you might need in an app, like env and paths, along with navigation. See the modules docs for full details.
The difference between the two is:
preloadCodefetches a single route’s actual page content, it’s ready to load quickly when the user navigates;preloadDatapreloads the page and also calls itsloadfunction ahead of time.
If you don’t use a load function (or if it doesn’t do anything dynamic), then the two will be effectively the same.
<script>
	import { preloadCode, preloadData } from '$app/navigation';

	preloadCode('/blog', '/about', '/blog/*');
	// OR:
	preloadData('/blog', '/about', '/blog/*');
</script>
Just a note that we should be cautious and judicious with our use of preloading. We don’t want to force users to download megabytes of data presumptively. That could very well cost them real money, for pages they might not even look at.
Add anchor options
Speaking of preloading: SvelteKit offers a slightly less greedy version of it, as one of its anchor options.
Anchor options are special, SvelteKit-specific attributes you can add to <a> anchor tags. There are three:
<a data-sveltekit-preload-code>causes the link to begin preloading as soon as the user hovers, rather than waiting for a click, saving some milliseconds. (There’s alsodata-sveltekit-preload-data, which also calls the page’sloadfunction.)<a data-sveltekit-reload>will prevent SvelteKit’s router from handling a page navigation, and will fall back to the browser’s native loading instead.<a rel="external">is the same asdata-sveltekit-reload, but the link is also ignored during prerendering.<a sveltekit:noscroll> prevents SvelteKit from resetting the scroll position to the top of the new page. This is usually undesirable on websites, but may be more intuitive in some app situations.
Conclusion
This has been a long post, and we’ve covered a lot. I hope this has been a valuable resource. Even if you still aren’t sold on SvelteKit (or at least, not as a static site generator), hopefully this post has given you an idea of the broad capabilities of SvelteKit, and maybe even given you some ideas of how you might use it yourself.