Impressions of the ZSA Moonlander at one month
A bit of background to start this post: I’ve never really been into mechanical keyboards. I wasn’t always into ergonomic keyboards, either. For most of my design and tech career, I was perfectly happy with the default Apple keyboard, or the built-in keyboard on the laptop.
Then, in 2020, constantly using my computer from home (usually on my lap, but sometimes at sub-optimal makeshift home workstations), I developed a repetitive stress injury, or RSI; chronic pain from, basically, doing things the wrong way too much. (Laptops are made for portability, not comfort.)
Eventually, I invested in a range of office ergonomics, including a standing desk, and my first split keyboard: the Kinesis Freestyle2 for Mac. The split took a little while to get used to, but it served me well for a year or two, allowing me to type with my wrists in a more natural, straight position.
However, while one problem was solved, a new one emerged: I began to develop pain in my thumb from constantly curling it under my hand to hold the command key (⌘) for shortcuts (especially cmd + tab, which I use constantly to switch apps).
Unfortunately, the Freestyle2 has no real key remapping ability. Plus, I felt ready for a change anyway. So, knowing that I’ll likely be typing on a keyboard every day for as long as my career lasts, I set out to find a new solution.
I read several articles on ergonomic keyboards, and asked about them in the ShopTalk show D-D-D-Discord, where I can often find good advice and opinions on office gear.
One of the candidates I mentioned being interested in was the ZSA Moonlander, which seems to be a very popular keyboard among both developers and keyboard enthusiasts. It boasts a wide range of impressive features and cool touches, but was on my list mainly because of the thumb keys, which seemed like they would solve my problems nicely.
When I mentioned the Moonlander in the #gear channel, Chris Coyier responded with this:

Turns out, Chris was actually serious, and after a few DMs to work out the details, a shiny, good-as-new Moonlander found its way to a new loving home in Kansas.
As of this writing, I’ve been using the Moonlander full-time—at work and on personal projects—for the last four weeks.
Adjusting to the keys and layout
The first thing that took getting used to with the Moonlander was its lack of some familiar keys in familiar places.
It’s easy to miss just glancing at photos, but its quasi-minimalist layout means that a few keys have been relocated from where you’d ordinarily look for them. For example, instead of finding both the dash (-) and plus (+) keys to the right of the number keys, as you would on a standard keyboard, you’ll only find one blank key. You can map it however you like (the real power of the Moonlander and keyboards like it is in custom keybindings; more on that later), but you won’t ever be able to put both of those keys up in that familiar location.
Similarly, a standard keyboard has three keys to the right of the first row of letters (both bracket keys and backslash), as well as three to the right of the middle row (semicolon, quote, and return/enter). On the Moonlander, however, you’ll notice only one unmarked key to the right of the P, and just semicolon to the right of the L, along with another blank key. (The bracket keys are still on the keyboard, but they’ve been moved down below the bottom row of letter keys).
In addition, the arrow keys are split between the two halves of the keyboard, rather than being colocated together, as standard. And, finally, tilde/backtick is all the way at the bottom-left by default, since there’s only room for one key to the left of the 1 (and by default, it’s mapped to =).
This is all to say nothing of how there are no function keys, and of course, no numeric keypad (though a lot of keyboards forego the latter anyway, to make more room for a mouse).
A keyboard without a numeric keypad, function keys, or arrow keys is often called a “60%” layout, as eliminating those keys makes the keyboard roughly 60% of a full-size.
Technically, the Moonlander is not a true 60%, since it has both arrow keys and many extra programmable keys. Some refer to this as 60%+.
It’s worth noting that you can both customize what any key does when you press it, and move the actual, physical keys around, if you so desire. For example, I moved my tilde/backtick key back to where it usually is, left of the 1 key. The caps can be removed and replaced very easily.
But just because you might not see a key on the keyboard does not mean its function is inaccessible. To the contrary, the Moonlander can actually do much more than a standard keyboard can—even a fullsize one. You just need to know where to look.
The Moonlander has 72 keys total, compared with 77 on a Macbook Pro with all 12 function keys. So while some keys are in unfamiliar places, you’re not actually losing much. Remember, you’re gaining six keys along the middle edges of the keyboard, and eight more on the thumb clusters (four on each side).
The general expectation is that you’ll use the thumb keys for extremely common tasks, like pressing shift, delete, command, enter, etc., thus moving the repetitive work from your weaker pinky fingers to your stronger thumbs. That, and/or to trigger macros for repeated tasks. (I haven’t yet found any tasks both that common and that keystroke-intensive in my day-to-day, but your mileage may very well vary.)
Even beyond that, you can set up keys to have different functions when long-pressed or double-tapped, effectively making every key capable of acting as multiple keys, depending on how it’s pressed.
If that’s still not enough, the Moonlander also offers several different layers of layouts.
A “layer” is a set of key mappings. The first layer is all your defaults, and is always on. But when you hold down one of the layer keys, the Moonlander switches to that layer, altering what the keys do.
For example, you might have a layer that makes the top row of keys behave like function keys. Or, you could toggle a layer that turns the right side of your keyboard into a number pad.
So everything you’re used to, and much more, is definitely available. You just have to remap your brain and muscle memory a bit.
And remap you will. It almost doesn’t matter what the default layout is, because it’s really made for you to customize any and every way you want. So don’t get hung up on defaults at all. You’ll want to spend plenty of time tweaking to figure out what works for you. I’m certain I’ve altered my mappings at least a few dozen times now.
The other thing that takes a lot of getting used to, coming from a standard(ish) keyboard, is the ortholinear, or “columnal” layout.
Ortholinear just means the keys are stacked in a direct vertical column, rather than staggered as on a standard keyboard. The Q key, for example, is directly in line with the A and Z keys vertically, rather than having Q offset to the left and Z offset to the right.
The rationale given is: your fingers don’t move side to side when you extend or retract them, so your keyboard shouldn’t place keys offset from your fingers’ natural position.
I can’t say for sure whether this makes a major difference, ergonomically. I don’t think the offset of the keys was ever a problem for me, so that’s hard to speak to.
What I can say, however, is that I never developed a “proper” typing technique (which, in fairness, could be at least part of what caused my RSI issues in the first place). My fingers didn’t tend to rest in the proper positions, and I rarely used my outer fingers to hit the “correct” keys at all. (I don’t think I ever used my right pinky for anything, actually.)
It didn’t take long to realize that, while I could get away with my poor typing form easily enough on a standard keyboard, an ortholinear layout would not be so forgiving.
I had to literally relearn how to type to use the Moonlander. Some of that, I’m sure, was just getting used to the ortholinear layout. After all, that muscle memory had been built over nearly a lifetime of using conventional keyboards. But to use the Moonlander well, I had to learn how to type the right way.
When I first started typing on the Moonlander, muscles in my arms that I never felt before suddenly felt exerted. At first, I took this as a lack of ergonomics on part of the keyboard. But with a little time, I realized this wasn’t strain; this was the healthy ache of muscles that don’t typically see use suddenly being called upon.
Fellow ShopTalk show Discord member and Moonlander user Alan Smith advised me:
[It takes] 2 days to not feel like you’re typing with mittens, 2 weeks to have the basics pretty well in your hands and 2 months to get to where you don’t think about 99% of the time.
I’d say that’s about right. After a few weeks of using this keyboard full-time, I’m still in a little bit of an awkward transitional phase, where I’m not quite as good at typing in this layout as I was on a standard keyboard before—but I’m also not as fast on a standard keyboard as I used to be. Still, though: I can tell I’m improving day by day. I have to think about things I don’t do much, and I still hit keys I don’t mean to, but the muscle memory is there for the common stuff.
I almost gave up. More than once, I put the Moonlander back in the box, resolute that I would never use it. But I’m glad I gave it more of a chance. It takes a long time to get used to, but there are benefits on top of that initial steep slope.
Ergonomics
The Moonlander is generally marketed as an ergonomic keyboard. Out of the box, however, I found its ergonomic options were surprisingly limited.
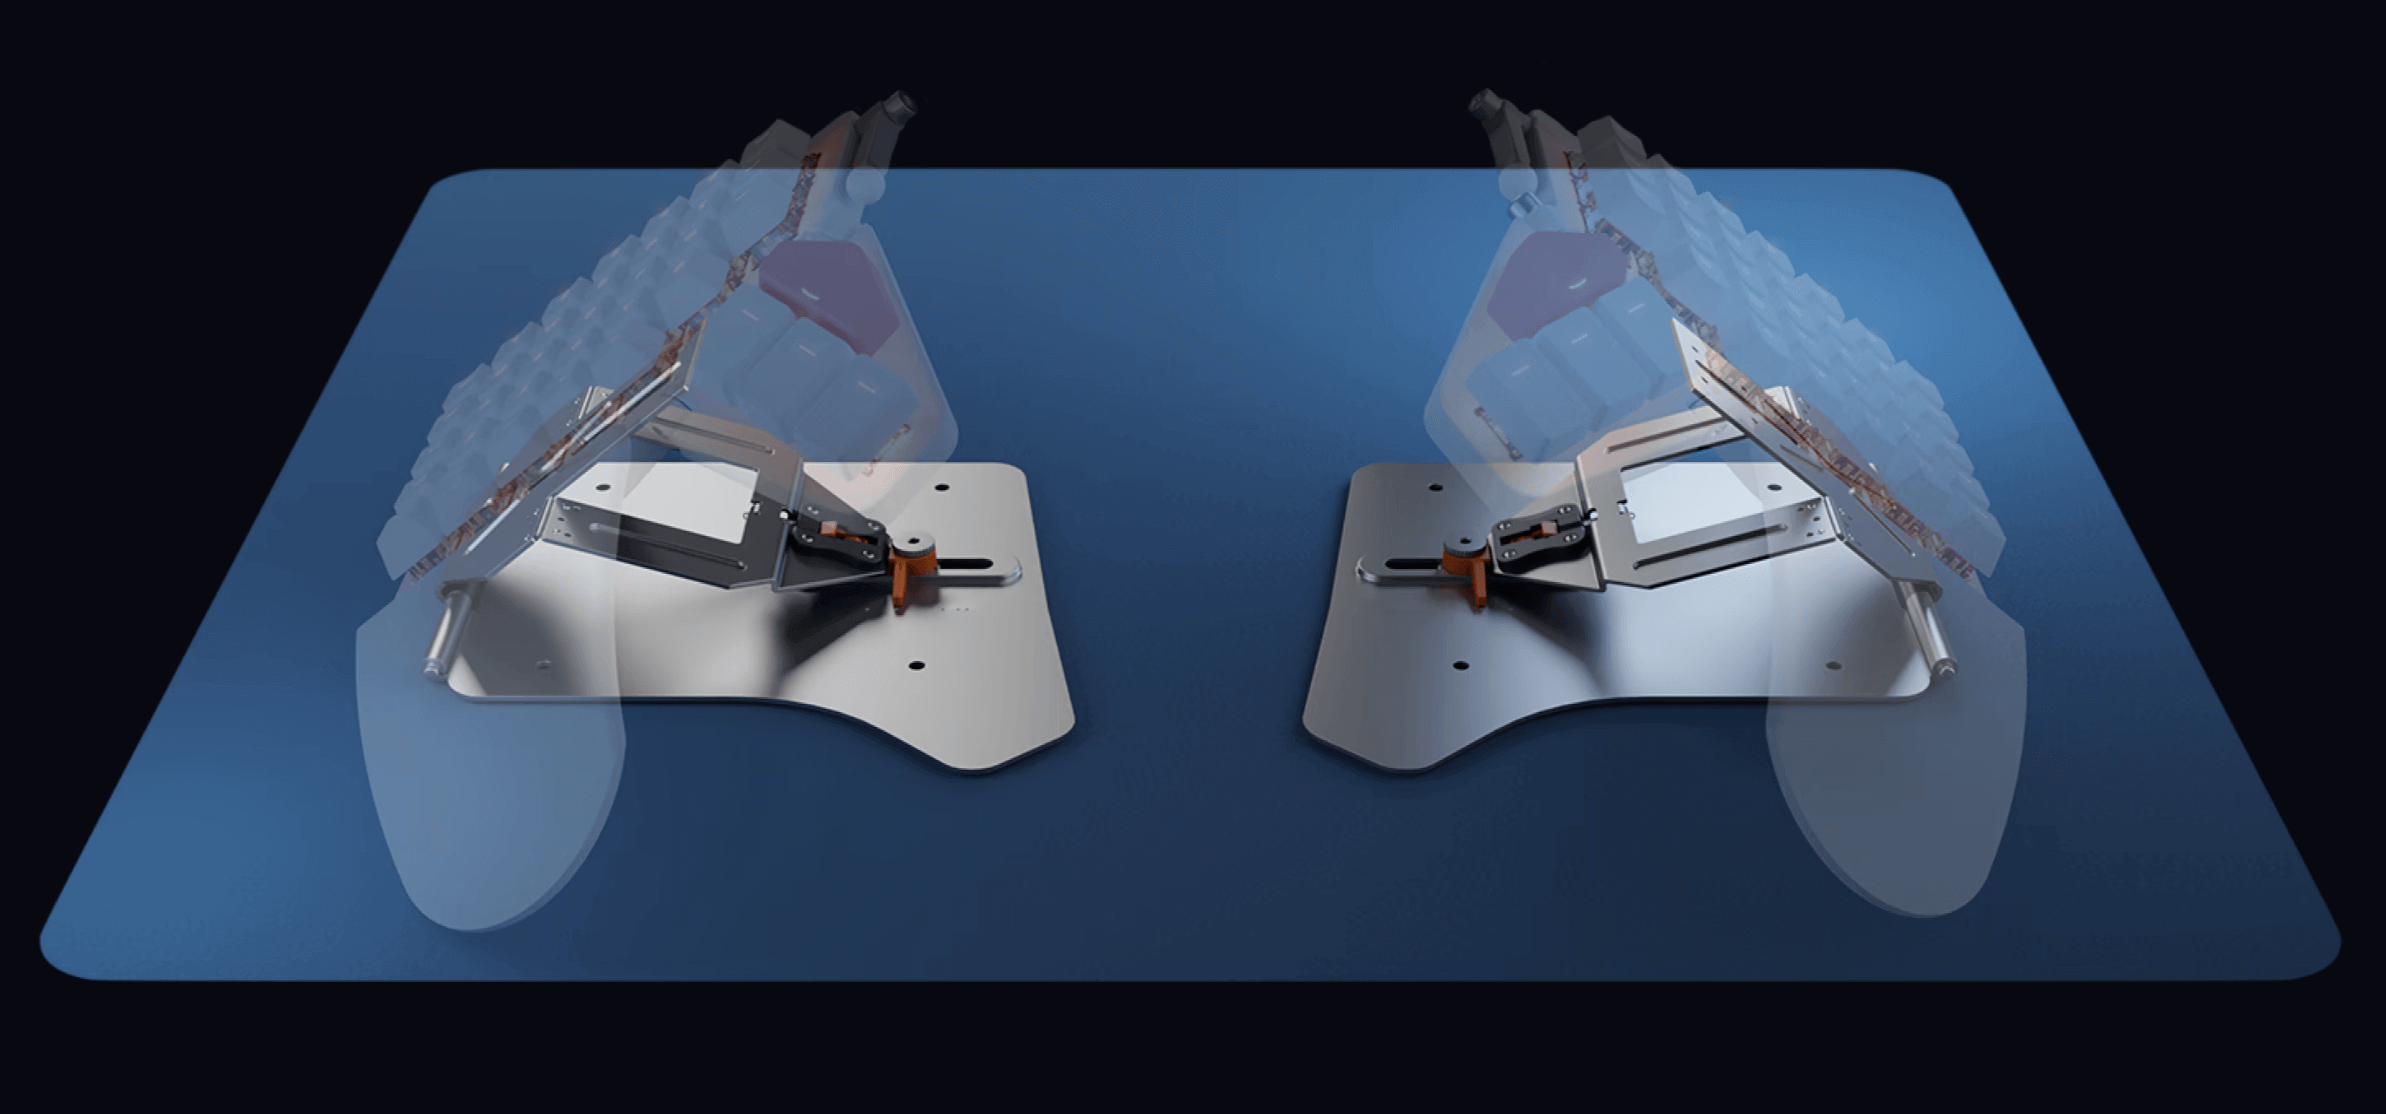
Yes, the leg on each half of the keyboard means you can tent it, up to a point. What may not be immediately clear, however, is that in order to tent the keyboard, you also have to rely on the hinged thumb key cluster for balance.
“Tenting” means raising a keyboard’s inner edges, so that it creates a tent-like triangular shape, which lets you type without rotating your wrists as far.
In other words: the legs alone aren’t enough to balance the Moonlander. If you try, the keyboard will teeter-totter as you type. The further you tent the keyboard, the more you also have to bend the thumb key clusters downward, to provide support and balance.
This may not seem like a big deal, but the more the thumb clusters are bent downward, the harder the thumb keys are to reach. (The clusters also bend upward, as the Moonlander’s marketing points out, if you have smaller hands and/or just want the thumb keys closer. You’d need to leave the keyboard 100% flat on the desk to allow this, however.)
So out of the box, the more you want to tent your keyboard, the bigger your hands (or reach) have to be. That’s far from ideal, and while I don’t think the marketing misrepresented this, necessarily, I certainly missed it. (As a less serious drawback: it also means you need to make four adjustments with a hex key to change the tenting, rather than just two.)
Fortunately, the Moonlander offers an add-on accessory called The Platform, which is a two-piece tenting kit. The platform bolts on, and allows each half of the keyboard to be independently tented to whatever angle you like, no legs necessary.
Unfortunately, while the Platform is certainly a marked improvement, there’s still no tilting available, negative or otherwise. It also goes for $112 USD, which is a pretty hefty price tag for a simple add-on.
“Tilting” means adjusting the keyboard so that it either tilts towards or away from you along its horizontal axis. Regular tilting is when the keys slope downward towards you; negative tilting is when the keys slope downward as they get further away from you.
Though everyone will have their own preference, negative tilting is generally considered ergonomically superior, so that your wrists are in a more relaxed, downward position, and not bent backwards.
On top of all this, the wrist rests are what I would call suboptimal. They’re very long (almost as long as the keyboard body), which means you may need to set your keyboard further away from you than you might otherwise like, just so it all fits on the desk.
Plus, the wrist rest is not cushioned in any way, and it sits a little lower than I think would be ergonomically ideal. (It’s flush with the bottom of the keys, rather than the top. This means you’d need some pretty pronounced negative tilting to make the wrist rests sit high enough to angle your wrists downward while typing—something, again, the Moonlander isn’t actually capable of.)
Some folks like to add padding or elevation on top of the wrist rests. That might be nice. They’re also removable, if they just don’t work for you, or you’d prefer to replace them.
Personally, I’ve gotten to the point now where I adjust my armrests high enough that my hands can float in air above the keyboard, rather than relying on the wrist rests (which, some would say, is better for you ergonomically anyway). So I could safely take mine off without missing them, but they look better than the obvious gap that would leave on the front. (There are accessories available to cover the hole, but you need to either buy them or 3D print them yourself.)
Overall, I think the wrist rests are a miss, and would love to see ZSA’s next keyboard ship with padded wrist rests that are both attached and adjustable, much like the thumb clusters. My feelings would likely be very different if I could raise the wrist rests higher.
All in all, while the Moonlander offers a bit more than standard keyboards in terms of ergonomics (especially with the Platform add-on), I’m disappointed that a keyboard marketed as “ergonomic” doesn’t go further.
The Moonlander seems to me like a keyboard trying to be cool first, and ergonomic second.
A premium add-on like the Platform really shouldn’t be required in the first place, in my opinion. But if a $112 (literal) bolt-on is required, then I feel it should at least do tilting. As-is, the Platform feels like it mostly just fixes a problem, rather than adds much of anything new—which is disappointing, since you’ll be in for nearly $500 USD by the time you purchase both.
If all you need is a split and some tenting, the Moonlander has you covered. But if you’re looking for a keyboard with a fuller range of ergonomics options, even with the Platform, the Moonlander may not get you all the way there.
In the latter case, you might be better off going with ZSA’s other major keyboard, the Ergodox EZ (just be sure you opt for the tilt kit and wrist rest—they’re both add-ons), or with a Kinesis model such as the newly released Advantage360—both of which, it’s worth noting, also have extra thumb keys. There are other companies making similar split keyboards, too, like Dygma.
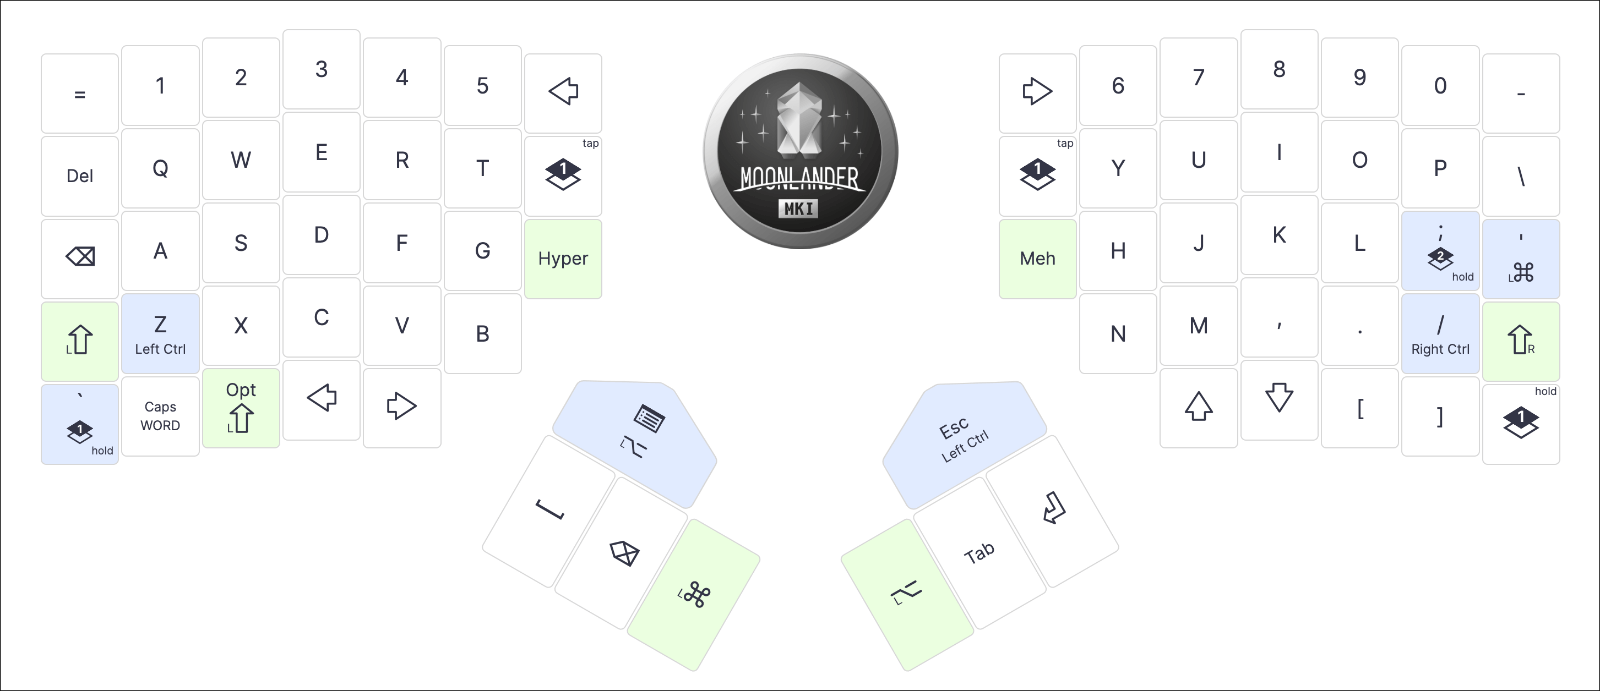
My Moonlander
If you’re curious about my own personal layout, you can check it out here:
If you click through, you’ll see I’ve got shift, command, and option on the left side of the thumb keys, with space, backspace, and enter on the right. That lets my thumbs do all the repetitive work (with more or less the same hand that would hit the keys by default). The big red keys are escape and tab, respectively, since those are a little harder to reach, and those keys are used a little less frequently. This has the added bonus of making my two most-used shortcuts—cmd + tab to switch apps, and cmd + space to open Raycast—available using thumbs only. (Tab is also available in its default position on the left, for when I need a one-handed combo.)
I settled on having hyphen on the inner left, and delete on the inner right. Meh and Hyper are both available from either side of the keyboard, for optimal one-handed shortcuts.
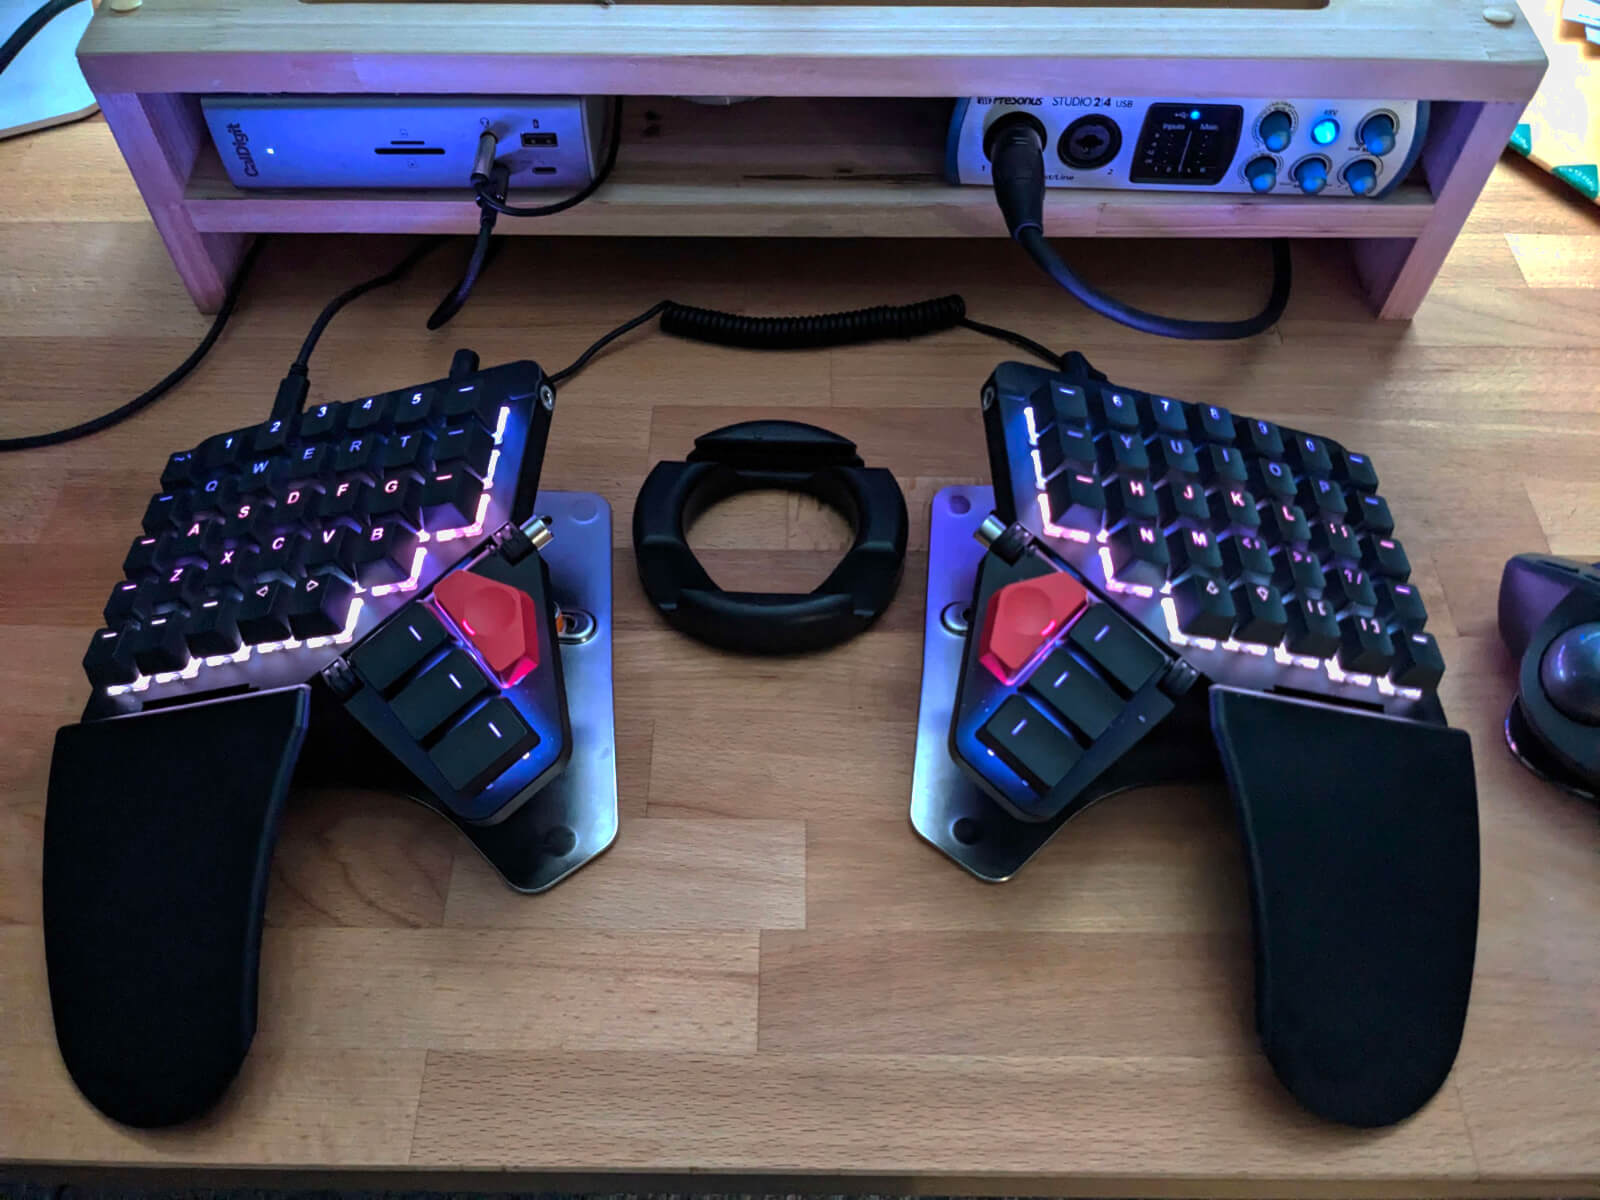
By the way, here’s what my current keyboard looks like. (I set the colors to Dracula Pro theme colors to match my VS Code theme, because that’s just the kind of nerd that I am.)
(Did I mention you can customize the lights? You can customize the lights.)
(Also: that thing in the middle is a smartphone holder, in case you were wondering. I wanted to leave my phone in it for the shot, but…well, see if you can spot the problem with that idea faster than I did.)
Incidentally, because it came secondhand, I didn’t get to choose the type of switches that were installed on my Moonlander by default. Chris’s choice was Cherry MX silent red switches, which are indeed nice and quiet (I’m probably using a microphone too much to enjoy loud, clicky switches, which I assume was also Chris’s thinking), but they’re also a little too easy to trigger accidentally just with the pressure of resting fingers, I thought. I currently have a shipment of Cherry MX Brown switches on the way (more tactile, still not very noisy), and I’m looking forward to replacing the switches and seeing how the feel of the keyboard changes.
[Edit: the switches have arrived and been installed, and I’m surprised how much better the keyboard feels. Typing on it is…a joy, somehow? I get the appeal of this stuff now. There’s genuine delight in letting your fingertips feel the way they want to feel when typing. The Cherry MX Brown switches feel nice, but now I almost want to try greens or blues for an even clickier experience.]
By the way: if you don’t have any idea what switches are, like me not so long ago (and that last paragraph didn’t really make any sense to you), this handy little switch tester (also recommended by the ShopTalk Discord) is a nice investment, and as a bonus, makes a nice fidget toy to have sitting on your desk for long, boring meetings. (Not that I would know.) ;)
Final thoughts and advice
While I’ve spent a sizable portion of this post either griping about the Moonlander’s shortcomings or imparting the difficulties of the adjustment, I’m still very happy I gave this keyboard a serious shot, and I plan to stick with it for the foreseeable future.
If you’re considering a similar move, here’s my advice:
Give it time. Seriously. Like I mentioned above, I gave up on the Moonlander (or so I thought) multiple times. It’s immeasurably frustrating trying to do something you know you’re good at, and sucking at it. That’s what it feels like for the first week or two, moving to a whole new keyboard with an unfamiliar layout. I was afraid to pair with any other developers for that first couple of weeks, for fear they’d see me typing slowly and ineptly. But there’s no way out but through.
Customize the heck out of it. Don’t force yourself to go with the manufacturer’s defaults; there’s no such thing as a “one-size-fits-all” when it comes to work ergonomics. Only you know what’s comfortable for you, what tasks you do often, and where things make the most sense for your workflow.
I’ve made dozens of adjustments, and will likely make many more. For me, 70+% of the unmarked keys on my keyboard have been remapped at this point, including all of the thumb keys. Some people love layers; I personally almost never use them, and just found a way to get everything I need onto the default layer.
It takes time to figure out all of your edge cases, hit all the corners of how you might use your keyboard, and evaluate the tradeoffs of your remapping decisions.
Make the keyboard the center of your workflow. If you’ve already set up custom shortcuts for yourself, those may not work well with your new layout. Don’t be afraid to remap existing shortcuts, and in particular, to lean on hyper and meh.
(“Hyper” is a single key that simultaneousy triggers
cmd+ctrl+shift+option. “Meh” triggers all of those, minuscmd—that’s all assuming Mac keys, that is; swap as appropriate for Windows.)Hyper and Meh are amazingly useful because no app tends to create shortcuts that require you to hit all of those keys at once. That means you can freely map basically anything you want to hyper and meh shortcuts, and as a bonus, they’re only actually two-key shortcuts to use.
For example: in my current setup, meh + an arrow key sends my currently open app to that half of the screen. Hyper +
=sets the current window to full screen size, and hyper + left/right moves the current window over to the next display.(All of the above are done using Raycast’s window management in my case, though an app like Rectangle offers the same abilities.)
Any time you find yourself doing something regularly that doesn’t already have an easy shortcut, consider creating one using meh or hyper. It’s amazingly powerful to have simple, two-key shortcuts for common tasks. So if you’re gonna use a keyboard like the Moonlander, lean all the way in and get the full benefit.
Make sure it’s plugged in well. I found the sockets and cable that connect the two halves of the keyboard a little finicky. If the cable isn’t fully connected, the Moonlander may not work at all. I actually thought mine had been damaged in shipping for about the first hour I had it, because it won’t even seem to turn on if things aren’t connected properly.
If you’re thinking about it, do it. I may not stick with the Moonlander forever, but I’m glad I took this leap because I feel like so many doors have been opened now. I’m a better typist, for one. For another, I know that any way I might need to customize this keyboard in the future, I can. For now, though, it’s a great tool that will only improve with time, as I unlock more of its potential, and mine with it.
Also, I feel confident that if and when I do decide to try another keyboard, the leap will be much smaller. I’ve already put in the time and effort to “git gud”, and that’s gonna carry over. That feels nice to know.
I hope this post has been helpful, if you’re considering a new keyboard of your own. Some quibbles aside, I’ve been increasingly happy with the Moonlander as I’ve grown accustomed to it, and began to learn to work with the grain of its nuances.